Ray is writing the next great American detective novel, and we’ve started by creating a remote BitBucket Git repository to manage his changes.
Ray clones the repository:
$ git clone https://ray-chandler@bitbucket.org/ray-chandler/noir.git
Consider that Ray now has a tracking branch called “master”; a remote reference called “origin”; and a remote-tracking branch “origin/master”.
He has many possible versions of his novel:
- The working tree contains Ray’s manuscript with any current un-staged, un-committed changes;
- The staging area may contain a copy that was saved for inclusion in the next commit (via add);
- HEAD is the most recent commit in the current branch (i.e. “master”);
- The remote-tracking branch “origin/master” may also have some un-merged differences from the last fetch operation;
- The “master” branch in the remote repository on the server may have some un-fetched changes recently checked in by Ray’s editor.
Wow, that’s five possible versions.
Scene: Ray sips at a glass of bourbon, and types furiously, making changes to Chapter 1. He saves his work periodically.
While Ray is accessing his muse, let’s learn about Git’s diff tool:
Using DIFF
The Git diff command is a tool we can use to compare different versions of source files:
$ git diff <target> <source> #
This produces a report of changes needed to make “target” look like “source”. There are some more common, special cases:
To make <target> look like the working tree:
$ git diff          # target = staging area
$ git diff HEAD     # target = HEAD
$ git diff <target>
To make <target> look like the staging area:
$ git diff --staged          # target = HEAD
$ git diff --staged HEAD     # target = HEAD
$ git diff --staged <target>
What would git commit -a do? Find out with:
$ git diff --staged HEAD
What would git commit do? Find out with:
$ git diff --staged
Examples
Consider the following sequence:
echo "This line is pushed to remote/master." > source.txt
git commit -a -m "Step1"
git push origin
git switch -c secundo
echo "This line is committed to secundo." > source.txt
git commit -a -m "Step2"
git switch master
echo "This line is committed to master." > source.txt
git commit -a -m "Step3"
echo "This line is in the staging area." > source.txt
git add source.txt
echo "This line is in the working tree." > source.txt
We’ve now got different versions of source.txt in all possible locations. Let’s find out the differences:
$ git diff
diff --git a/source.txt b/source.txt
index 16f0b21..c260d9d 100644
--- a/source.txt
+++ b/source.txt
@@ -1 +1 @@
-This line is in the staging area.
+This line is edited in the working tree.
Yup, that describes how to update the staging area to match the version in the working tree. (From here on out, I’ll omit the first few lines of the diff output).
$ git diff --staged origin/master
:
-This line is pushed to remote/master.
+This line is in the staging area.
$ git diff secundo master
:
-This line is committed to secundo.
+This line is committed to master.
Exercise for the student: Try out the other variations.
Back to that detective story
Cut scene: Editors office. Penny White is sitting at her computer.
Penny cloned the repository yesterday, but she’s pretty sure they’ll be some updates from Ray on the server:
$ git fetch origin
:
Unpacking objects: 100% (6/6), 738 bytes | 22.00 KiB/s, done.
From https://bitbucket.org/ray-chandler/noir
   14c6528..713d32a  master -> origin/master
$ git status
On branch master
Your branch is behind 'origin/master' by 2 commits, and can be fast-forwarded.
 (use "git pull" to update your local branch)
nothing to commit, working tree clean
Penny could merge at this point, but before she does, she’d like to see what the changes are.
From our experiments above, we know that in order to see what will change during the merge, Penny will need to request a diff using “master” as the <target> and “origin/master” as the <source>:
$ git diff master origin/master
diff --git a/detective.txt b/detective.txt
index df79c59..8616f4d 100644
--- a/detective.txt
+++ b/detective.txt
@@ -1,7 +1,9 @@
 Chapter 1

 There was a knock at the door. I quickly hid the comic book under the WIRED magazine
-and took out some official looking papers and scattered them about the desk.
+on the desk and took out some official looking papers and scattered them about.

 "Jess!" I yelled.

+The door opened. The siloette blocking the light from the door was a dame,
+but it wasn't Jess.
Ray has been busy. The first thing Penny is going to do after merging is correct the spelling of “silhouette”.
A Graphical Diff
Penny is not a fan of the text output from diff, so she has read up on the difftool command. It is essentially identical to diff, except Git will launch your preferred graphical utility to display the diff information.
If you’re interacting with source code from inside an IDE that includes Git integration, this probably won’t be something you’ll need to do. But it helps to understand what is going on behind the scenes.
I recommend meld, as it is reviewed positively and has versions for both Windows and Linux: https://meldmerge.org/
After we’ve installed it, we can enable it in Git by adding the following lines to .gitconfig:
[diff]
    tool = meld
[difftool "meld"]
    path = meld    ; Windows: c:\\Program Files (x86)\\Meld\Meld.exe
[difftool]
    prompt=false

[merge]
    tool = meld
[mergetool "meld"]
    path = meld   ; Windows: c:\\Program Files (x86)\\Meld\Meld.exe
[mergetool]
    keepBackup = false
Penny views the changes using Meld:
$ git difftool master origin/master
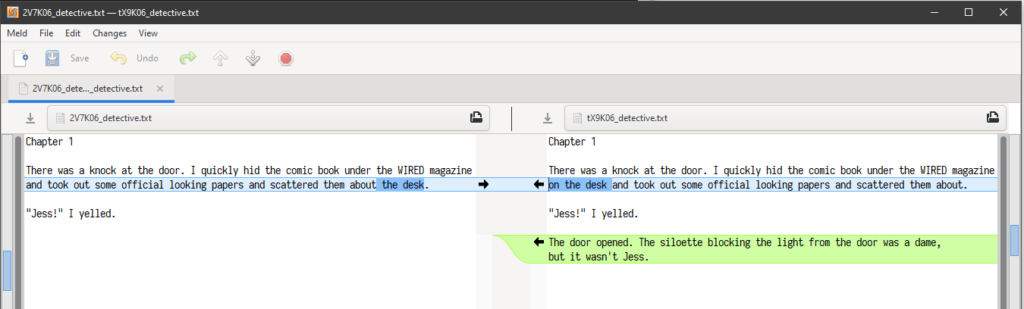
Meld presents each changed file in a separate window, opening them in sequence as the previous one is closed. For many files, this can get clumsy.
An alternative would be to generate a list of files with differences, then launch the difftool for each file on your own schedule:
$ git diff --compact-summary master origin/master
 detective.txt   | 7 ++-----
 references.txt  | 1 -
 2 files changed, 2 insertions(+), 6 deletions(-)
$ git difftool master:detective.txt origin/master:detective.txt
That last command demonstrates how Penny would specify a single file, using the “branch_path:file_spec” notation.
Further reading:
- https://git-scm.com/docs/git-diff.
- https://stackoverflow.com/questions/34119866/setting-up-and-using-meld-as-your-git-difftool-and-mergetool
That’s all for this Appendix. Go back to the article here.
Recent Comments