We’re enjoying our new Synology NAS, and leveraging DLNA to access music and video from any client on our network, including iPad, Roku, and desktop devices. Audio CD ripping on Linux Mint isn’t a problem, but DVDs are more complicated.
I’m using Handbrake, because it is open source, free, fast, and very configurable. Also, it is available for both Windows and Linux. On the downside, it is not newbie-friendly; not a point-and-click app. “With great flexibility comes a learning curve”. Hence, my decision to write up my process so far.
Installing Handbrake
In Linux Mint, Handbrake is available in the Software Manager. At time of writing, there are three options available. I chose the GUI version that is not flatpak.

Installation was uneventful. The UI is complicated, at first blush, and I’m not qualified to explain it. I will document my steps to rip a DVD.
About commercial DVDs
A DVD is essentially a file system with directories (such as VIDEO_TS) containing files, including menus, videos, FBI warnings, trailers, images, etc. Depending on the DVD, there may be multiple video files for different aspect ratios. Languages, commentaries, and captions seem to be encapsulated in the video files themselves, although there may be multiple video files for different aspect ratios or edits such as Director’s Cut, alternate endings, etc.
Choosing a format (I)
It is possible to create a single .ISO file containing a disc image of the DVD, and copy it to the NAS. There are clients (e.g. VLC) that can open the .ISO and present the disc menu interactively, just like a DVD player. That’s one option. On the downside, .ISO images take up storage space, and you are limited in how to view them over the network. Given our DLNA ecosystem, I wanted to explore extracting the video files into a format that was more compact and streaming-friendly.
There are more formats than you can shake an empty DVD case at, each with advantages and disadvantages. More on this later.
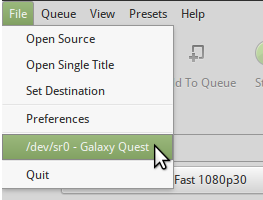
Loading a DVD into Handbrake
Insert the DVD into your drive, and close any application that tries to play it automatically. I chose a commercial release of the film “Galaxy Quest” because they’ll be some extra bonus features and soundtracks to review.
Run Handbrake (the icon is under the Sound & Video menu) and scan the disc for source files. I found the quickest way to scan the disc in Handbrake is to use the File menu, there’s an entry for the optical disc drive:
Handbrake scans the disc and identifies a list of 25 possible source files.
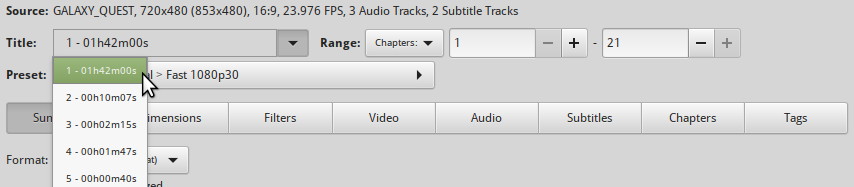
By default, the first file is selected.
Exploring the DVD files
Note that at first glance there is no information about what these source files are, except for their sequence number and their duration. There’s no way to view any DVD “menu” within Handbrake, although Handbrake will generate a set of preview images from each source file to help us identify.
Here’s what I determined from reviewing the preview images for each title:
 1  1:42:00   Feature Presentation
 2    10:07   On Location In Space - Making Of
 3     2:15   unknown sequence
 4     1:47   unknown sequence
 5      :40   unknown sequence
 6      :52   unknown sequence
 7     2:02   FX test sequence?
 8     1:30   unknown sequence
 9      :47   unknown sequence
10     9:47   unknown sequence
11     1:54   unknown sequence
12     1:12   Trailer #1
13     2:20   Trailer #2
14     1:50   Trailer #3
15     2:09   Tim Allen talking
16      :42   Sigourney Weaver talking
17      :46   Alan Rickman talking
18      :21   Tony Shaloub talking
19      :34   Sam and Daryl talking
20      :21   Sam and Daryl talking
21     1:21   talking head
22      :25   talking head
23      :35   talking head
24      :13   talking head
25      :24   Dreamworks Logo
Handbrake can extract any one of these 25 source files and convert to a stand-alone video file. Galaxy Quest is an “interesting” example, in that the extras aren’t obvious. The actual DVD menu may help decipher this list. Handbrake can’t play the DVD menu, but VLC can. (Or I could put the disc in our DVD Player.)
Looking at the DVD menu in VLC allowed me to compile:
PLAY MOVIE
SCENE INDEX
SPECIAL FEATURES
    On Location In Space (10:07)
    From The Cutting Room Floor
        PLAY ALL (9:47)
        1. Tech Talk with Sergeant Chen (2:15)
        2. Alex tours his "personalized" quarters (1:47)
        3. A running spat between old flames (0:40)
        4. Guy gets attacked (0:52)
        5. Alex's motivational speech (2:02)
        6. Gwen saves the day (1:30)
        7. The Crew vs. Sarris (0:47)
    Theatrical Trailer (1:54)
    Sneak Preview Trailers
        Chicken Run
        El Dorado
        Road Trip
    Cast and Crew
    Production Notes
SUBTITLES
    English Only Captions ON/OFF
AUDIO
    5.1 ENGLISH DOLBY DIGITAL
    2.0 ENGLISH DOLBY SURROUND
    2.0 THERMIAN DOLBY SURROUND
OMEGA 13
We can now cross-reference this and update that source file list from Handbrake:
 1  1:42:00   Galaxy Quest
 2    10:07   On Location In Space - Making Of
 3     2:15   Deleted Scene - Tech Talk
 4     1:47   Deleted Scene - Alex's quarters
 5      :40   Deleted Scene - Old flames
 6      :52   Deleted Scene - Guy gets attacked
 7     2:02   Deleted Scene - Alex's speech
 8     1:30   Deleted Scene - Gwen saves the day
 9      :47   Deleted Scene - Crew vs Sarris
10     9:47   All Deleted Scenes (alternative)
11     1:54   Theatrical Trailer
12     1:12   Trailer #1 - Chicken Run
13     2:20   Trailer #2 - El Dorado
14     1:50   Trailer #3 - Road Trip
15     2:09   Tim Allen talking
16      :42   Sigourney Weaver talking
17      :46   Alan Rickman talking
18      :21   Tony Shaloub talking
19      :34   Sam and Daryl talking
20      :21   Sam and Daryl talking
21     1:21   Unknown talking head
22      :25   Unknown talking head
23      :35   Unknown talking head
24      :13   Unknown talking head
25      :24   Dreamworks Logo
My guess is that the 15 – 24 “talking heads” clips are somehow part of the “Omega 13” bonus feature, but I couldn’t figure out how to play them from the DVD menu.
Now we have enough information to start the extraction process.
Extracting/Ripping a source file
Let’s start with the Feature Presentation.
Select Title 1 in the Title: dropdown if it isn’t already selected. Note that there are 21 chapters in this source file.
Choosing a format (I)
We need something compatible with common DLNA clients that can retain the multiple audio tracks and subtitle captions; and keep the original DVD image resolution (or close to it). We don’t need HD video, 48kHz sound or 5.1 surround sound. MP4 or MKV seem like a good option.
From the Preset: dropdown, choose Official > Matroska > H.265 MKV 720p30

There are a series of “tab buttons” that select different pages in the UI. We can skip the next two and go directly to Video.
Selecting Video conversion options
The output format preset I’ve recommended here is definitely not the fastest to convert, at least as configured by default. Alternatively I’ve had good results using a different preset, Official > General > Fast 720p30 which is .M4V, and given the debate here, I don’t want to recommend that unilaterally. But it seems faster to process; and the output looks fine; and it is definitely not limited to just Apple clients.
I compared processing time and output file size, limiting the run to just chapters 1-3 of the Galaxy Quest feature presentation:
Fast 720p30
Render Time:  4:48
Size: 123.5 MB

Matroska H.265 MKV 720p30
Render Time: 22:04
Size: 108.3 MB
Playing back each of the converted files, I honestly couldn’t tell a difference. They both looked like “perfect” DVD quality rips, and captions and audio soundtrack selections were available.
Hence my personal choice of “Fast 720p30” over the “Matroska”.
That said, just looking at all the options under the Video tab, clearly there is a lot of scope for tweaking; trading off conversion speed for quality, etc. Ideally we want to retain as much of the original quality of the source as possible. However, I don’t recommend changing anything here until we know what the consequences are. Let’s stick with the preset defaults for now.
Next: Audio.
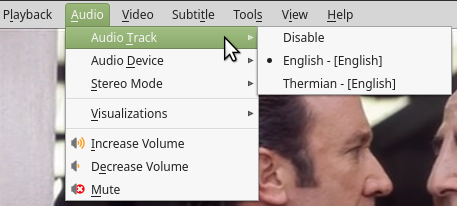
Selecting Audio Tracks
Handbrake makes a default selection but I recommend clicking on + Add All and reviewing.
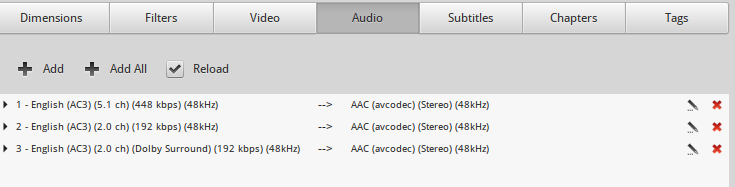
Normally these are obvious, such as Alternative language dialog, or a Director’s Commentary, etc. Galaxy Quest is a bit of an outlier in that, according to the DVD Menu options (see previous) there are two English-language soundtracks plus an Alien “Thermian” language soundtrack (ha!). I think it would be nice to have two audio tracks available, English and Thermian, and I’d like to alter the default name so that we can tell which is which.
We can remove the 5.1 track because we’ll take our English soundtrack from the 2.0. (5.1 would be fine if it were the only option – but we’ll be converting to Stereo so 2.0 is fine and probably easier for the conversion.)
If we click on the “edit pencil” icon, we can change the name of subtitle Track 3:

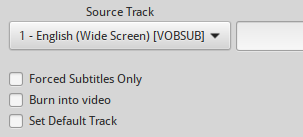
Choosing Captions/Subtitles
Next, we select Subtitles. Again, click on + Add All to review the available options:

Why are there two options here? It’s complicated and I don’t fully understand it. Succinctly put:
the closed captions is a data packet inside the mpeg2 video stream and subtitles is a separate stream inside the vob file
“baldrick”, Videohelp forum
Until I have a better handle on which type is best suited to our needs, I retain both to make them available for clients that support them.
Reading List: Handbrake Subtitles: a Complete Guide for First Time Users
VOBSUB are bitmapped overlays, whereas CC608 are text rendered by the player. Probably CC are better, if available, but so far I’ve retained both as available.
Some clients don’t support optional closed caption display, and if we had no other choice, we could choose one of these two subtitle tracks and “burn” them into the rendered video. We wouldn’t be able to turn them off, but they would be displayed by lesser-capable video players. We’d do this by clicking on the “Edit Pencil” against one of the tracks, and changing the option:
(Note to self: Try [x] Set Default Track to see if captions are displayed by default, even by “lesser capable” video player clients.)
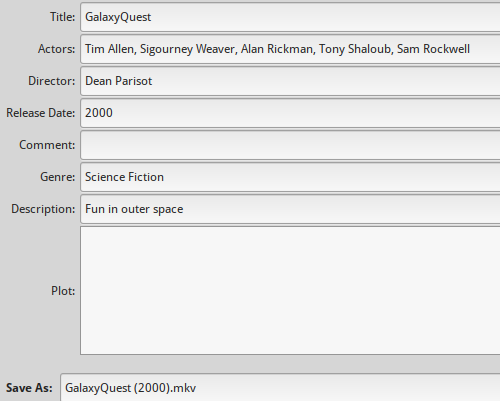
Enter the Metadata
Now we select Tags, and change the metadata to suit. At this point, I also change the Save As: output file name that will be created for this Title:
Batch Processing
At this point, we can start the extraction/conversion process immediately, or we can put the job onto a queue and define the next title. Let’s do that: Click on Add To Queue in the toolbar at the top of the window.

Let’s also add the “Making Of” extra as a second job to the queue. We can do this quickly:
- Select Title: 2 – 00h10m07s which we identified above as being the documentary featurette “On Location In Space”;
- Leave the Preset unchanged;
- Click on Audio; +Add All (observe: only one track; leave it as-is);
- Click on Subtitles; +Add All (observe: no subtitles available (typical for a bonus feature);
- Click on Tags; enter metadata and set output file name;
- Click Add To Queue
Review The Queue
We can view and edit the queue by clicking on the Queue (2) button in the toolbar:
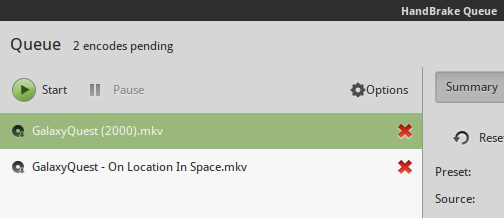
Now we can process the entire queue by pressing Start.
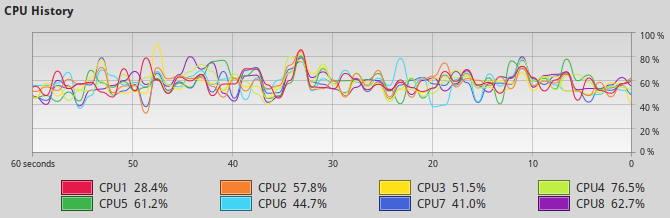
Help! My Computer Is Melting!
You’ll notice that Handbrake is making good use of all cores in your CPU and your cooling fan has cranked up to max.
Resource Monitor shows all CPU cores are maxed? YOU SHOULD BE FINE. It’s what they’re for.
However, if it absolutely positively DOESN’T have to be completed in the shortest possible time, you can tell Handbrake to cool its heels and relax its grip somewhat.
Install cpulimit
Linux Mint has the command-line tool cpulimit in the Software Manager:

After you’ve installed it, I recommend editing the command-line of the Handbrake launch menu item, from:
ghb %fTo:
cpulimit -l 400 ghb %fThe -l option specifies a percentage of CPU resources to the application. The trick here is that 100 = 100% of one CPU core. My system has effectively 8 cores, so “400” means that Handbrake (ghb) will only use 50% of the total CPU core resources. You’ll need to tune that number to suit your system.
Here is my system ripping a DVD:
And now, we wait. <skeleton.png>
Reviewing The Results
The Audio Tracks are available, with our naming:
The subtitle tracks are available:
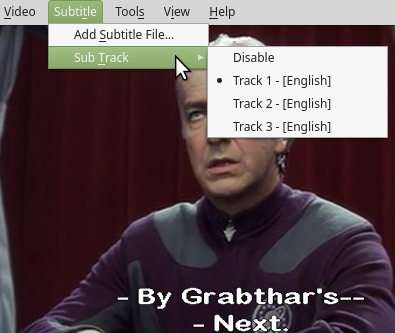
Now you can see why specifying our own label against the audio and subtitle tracks can be beneficial. Track 1 is actually “English (Wide Screen) [VOBSUB]”; and Track 2 is “English, Closed Caption [CC608]”. They contain the same captions but they are rendered differently (how they are rendered could be player-dependent).
Track 3 adds Chapter identification (e.g. “Chapter 2”) at the bottom of the window. I need to investigate what option controls this.
Recent Comments