This isn’t really a very happy Thanksgiving for C & me, even though we know we have a lot to be thankful for. C is currently packing for a sad trip home. I’m not going to be able to be with him this time and am writing this blog entry partly to keep my mind off things.
I’m also writing it because somebody has badgered me into it: A gentleman named Mansoor Ikbal feels I did not give sufficient aid to his work in my previously-published entries on Table of Contents production.
I expect he was working from this entry, but am not sure which, of several, he tried. (When I say “last time” in reference to previous entries on this topic, in the instructions below, this entry is the one I mean.)
I’m also not sure exactly where his problems are, although he indicated in one message that he didn’t have much luck dealing with the permissions problems. I do know that he is working on RDLCs in RS 2008, and that entry was written for 2005. As indicated in that entry, much can change, especially with localmode use of the ReportViewer control, in the sequence of evaluation between versions, as well as between renditions.
The fact that Mansoor Ikbal wants his TOC at the end, rather than at the beginning, of the report might also contribute to differences between what he experiences and what I laid out in the earlier walkthrough(s).
Whatever his problem is, I will try to explain again, with a new walkthrough written using BI Studio 2008. This time, I will simplify the method as much as possible to leave out anything that might be contributing to his problems following my instructions. This time, as last time, I will also not present a method that necessarily shows a correct TOC in the interactive display; it’s designed to be correct for the PDF output. As usual with this stuff, you have to do them differently, and the interactive version is actually quite different, and much easier (given that he wants the TOC at the end), in this case.
Because I used an ASPX page last time, I’ll use a winform host for the report viewer control this time, just to change things up. (I’m not sure if it makes any difference to the localmode PDF renderer; let me know if you have ever observed this.)
You might also have to make the winform app fully trusted or otherwise be careful about where you put files you create during the report run, but that’s always the case.
The general strategy should be pretty much the same as it was before:
- We’ll use a textbox in the page header to send information to custom code about the current page number and the current group header, as we did earlier. The actual code is slightly different, and simpler, partly because there’s only one group level in this example.
. - Because we want to adjust the PDF content, we’re going to persist the information about page numbers in an external file, where we can pick it up again on a second run.
You’d think we wouldn’t need to do this, considering that the TOC appears at the end, but we do, at least in my tests with 2008. Remember that you can’t control in what order a renderer handles the page headers and footers versus the body, and page headers and footers are where page numbers can be got.
In this particular walkthrough, I put the TOC in the body section, to make sure it would have as much room to stretch as it wanted. So this element in the body is picking up on information it got after the page headers and footers were done. In my tests, this did indeed require two runs to work reliably.
. - Because we want two runs before the TOC can reliably appear, I’m once again suppressing display of the export button from the standard report viewer interface, and providing a button on the form where the user can request a PDF. My code under the button can therefore do the two runs.
. - Last time I did this, I used an XML format in the external file, to allow for additional information (such as multiple group levels). Here, I’ve removed that complexity. I’ll just write exactly what I want to appear in the TOC into that file (you could gussy it up with HTML markup, I suppose). Of course I still have to assure access to file IO. We’ll assure this access with almost the same code as in the last walkthrough, only simpler, because we won’t have to assure access to the System.XML libraries.
.
Ready?
OK, then. Here’s all the code.
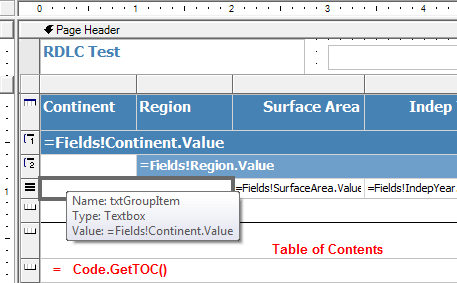
Let’s start with the RDLC. It looks like the screen shot below in the Designer. As you can see, I’ve actually put the TOC into table footer rows here. There’s a simple expression (= Code.GetTOC()), that retrieves the full TOC using custom code, which you’ll see in a minute:

But in this case, what you can’t see is more important to what you get.
There are two textboxes that are white-on-white in the screenshot.
One, over which I’m hovering in the screen shot, is in the detail row of the table. It provides the grouping information we’ll need to determine whether a new group has started on this page (we want our TOC to give a page number for the beginning of every group, in my example). I’ve put this in the detail band because, if it isn’t the first page of the group, the actual group header row with this information might not appear on the page.
The second white-on-white textbox is in the Page Header. It contains the following expression (see, I told you I was simplifying it from the last example):
= Code.SetGroupPage(ReportItems , Globals!PageNumber, Globals!TotalPages)
Turning to the custom code, here’s what we’re doing:
Shared LastGroup As String = “”
Public Function SetGroupPage(ByVal r As ReportItems, _
ByVal pagenumber As Integer, ByVal totalpages As Integer) As String
Dim group As String, theFile As String = GetFileName()
‘ see note below; you may be passing in one or more values here and
‘ sending them on to the function that derives the filename
If pagenumber = 1 AndAlso System.IO.File.Exists(theFile) Then
System.IO.File.Delete(theFile)
End If
If r(“txtGroupItem”) Is Nothing Then
group = “”
Else
group = r(“txtGroupItem”).Value.ToString()
If group <> LastGroup Then
System.IO.File.AppendAllText(theFile, _
“Group “ & group & ” starts on page “ & pagenumber.ToString() & vbCRLF)
End If
LastGroup = group
End If
Return “”
End Function
Function GetFileName() As String
Return System.IO.Path.GetTempPath() & “MyTextFile.txt”
‘ you could use some method to distinguish this report
‘ and this instance from others, instead of a literal file name
‘ as soon here. However, make sure you will be able to determine
‘ it the same way for both the reads and the writes, no matter what
‘ sequence of execution is used by any renderer.
‘ If this RDLC is being used by an ASP.NET application, for example,
‘ you could pass the user name and/or userID in from the report,
‘ or use a session ID that you add to the report as a parameter
‘ and use that to derive the filename. You must pass it both
‘ at the time you want to read and the time you want to write.
‘ Another way to do it is to derive the full filename from the
‘ calling application and pass *that* into the report as a parameter.
End Function
Public Function GetTOC() As String
‘ see note above; you may be passing in one or more values here and
‘ sending them on to the function that derives the filename
Return System.IO.File.ReadAllText(GetFileName())
End Function
That’s really all the magic. Now comes the code outside the report, which as you’ll see is trivial.
Here’s what I’ve put in the load event for the form:
‘ the following two lines are what I’ve added
‘ the first one is because we can’t rely on the internal Export to give
‘ us what we want, so we’ll suppress its ability to do so, and
‘ add a button to the form to explicitly Export
‘ to PDF, running code twice, instead
Me.ReportViewer1.ShowExportButton = False
‘ The second line is take directly from a gotreportviewer.com sample, and
‘ looks exactly like what I did last time except I’m omitting an additional
‘ line that dealt with System.Xml last time.
‘ This allows the RDLC to write out and read a text file:
Me.ReportViewer1.LocalReport.ExecuteReportInCurrentAppDomain( _
Assembly.GetExecutingAssembly().Evidence)
‘ end of what I added to the form load.
… and, as explained earlier, I have added an “Export to PDF” button to the form, so I obviously have some code under that button. Here it is:
Private Sub Button1_Click(sender As System.Object, e As System.EventArgs) _
Handles Button1.Click
Dim bytes As Byte()
‘ the print layout renderer *should* (caveats about layout and margins belong here)
‘ give us the same layout and same TOC values as the PDF will need. I don’t really
‘ know if this is required, but put it here as a reminder that if the text file exists
‘ because of the interactive display, from a previous refresh, it’s likely to be wrong
‘ for the PDF:
Me.ReportViewer1.SetDisplayMode( _
Microsoft.Reporting.WinForms.DisplayMode.PrintLayout)
Me.ReportViewer1.RefreshReport()
bytes = Me.ReportViewer1.LocalReport.Render(“PDF”, _
Nothing, Nothing, Nothing, Nothing, Nothing, Nothing)
‘ now do it again to make sure we have the right values,
‘ and not the values belonging to the interactive renderer
‘ or some other renderer
bytes = Nothing
Me.ReportViewer1.RefreshReport()
bytes = Me.ReportViewer1.LocalReport.Render(“PDF”, _
Nothing, Nothing, Nothing, Nothing, Nothing, Nothing)
Dim fs As New FileStream(“c:\temp\test.pdf”, FileMode.Create)
fs.Write(bytes, 0, bytes.Length)
fs.Close()
fs.Dispose()
fs = Nothing
bytes = Nothing
EndSub
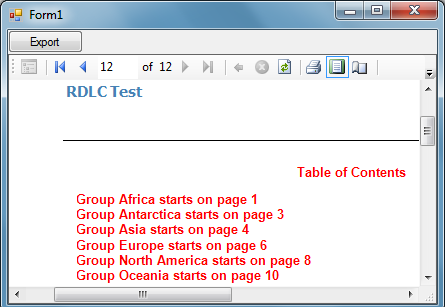
… that’s the rest of what you need. Honest. When you push the Export button, you see the Print Layout in the report viewer, with the last page including a TOC with the right values, and the PDF last page will match this display:

If you only need to do this for the interactive report, you’ll find it much easier: you can actually use a StringBuilder to accrue the TOC information, and then you can put the contents of the StringBuilder into the last-page pagefooter. No need to worry about external files and getting permission to read and write them, or even two runs.
Why doesn’t it work this way for PDFs? Repeat after me: the renderers do things in their own way. Get over it.
You sound sad in your post. Chear up. It’s going to get better..i promise.