|
By Colin Nicholls This article is based on a session I gave at the Advisor Visual FoxPro DevCon in June 2005, in which I described the new report previewing abilities of Visual FoxPro 9.0, and demonstrated the basic techniques that it uses "behind the scenes". IntroductionA quick history lessonVisual FoxPro 8.0 and earlier versions featured a "closed system" when it came to reporting. If you didn't like the results of a standard REPORT FORM ... PREVIEW command, or required more flexibility, your only alternative was to write your own FRX parser and output generator in pure FoxPro code. This is possible to do, but complicated and frustrating, because you would need to re-implement most of the existing functionality built-in to the FoxPro reporting engine. The older, VFP8-and-earlier reporting system is still there in VFP9 if you need it. There are good reasons - including guaranteed backward-compatibility - to use it occasionally: SET REPORTBEHAVIOR 80 REPORT FORM ... [PREVIEW] A quick "preview" of reporting options in VFP 9In 9.0, the FoxPro reporting system gets an exciting addition of a new base class packed with reporting goodness: The ReportListener class. This is your object-oriented gateway to the powerful FoxPro reporting engine. In addition to this base ReportListener class, VFP9 contains some additional "hooks" that allow you to attach components written in pure FoxPro. This enables a kind of hybrid reporting model, leveraging the power of the built-in reporting engine with the flexibility of custom FoxPro code. You attach a ReportListener object to a report run using the new OBJECT clause: REPORT FORM ... OBJECT <ref> Or, you can attach "factory" applications" to the report engine so that it gets the ReportListener objects it needs, automatically: SET REPORTBEHAVIOR 90 _reportoutput = "listenerfactory.app" _reportpreview = "previewfactory.app" REPORT FORM ... This is a very powerful and flexible architecture, and in the rest of this article I'm only going to cover the previewing aspect. The Simplest Preview EverI'm going to start out by showing you how to create the simplest preview ever. You're going to use two attributes of the ReportListener class: the ListenerType[msdn] property and the OutputPage()[msdn] method. First, you create a base ReportListener object: rl = newobject("ReportListener")
rl.ListenerType = 3
This property is a special one that controls how the listener responds when attached to a report run. (More on this later on.) Now kick off a report run, with the listener object plugged into the process: REPORT FORM _samples + "\Solution\Reports\colors.frx" OBJECT m.rl Nothing appears to happen. Why? I'll get to that in a minute. Now it's time to use another attribute of the listener object: OutputPage. OutputPage() parametersIntellisense will tell you the parameters: rl.OutputPage( nPageNo, eDevice, nDeviceType ) nDeviceType tells the listener what the parameter eDevice is:
You're going to use nDeviceType = 2, so you need to create a target object: _SCREEN.AddObject("canvas","Shape")
_SCREEN.Canvas.Width = 250
_SCREEN.Canvas.Height = 300
And now invoke the listener's OutputPage() method to render page 1 of the report: rl.OutputPage( 1, _screen.Canvas, 2 ) Et Voila: you get an image of the report drawn on the screen:
Note that we didn't make _screen.Canvas Visible. There's more. Try the following from the Command window: _SCREEN.Canvas.Width = 500 rl.OutputPage( 2, _screen.Canvas, 2 ) clear rl.OutputPage( 1, _screen.Canvas, 2 ) You have now observed the following:
From this you can deduce that:
Aside: Is OutputPage() a method or an event?Although the help file will tell you that ReportListener's OutputPage() is a method rather than an event, it is important to understand that - depending on the value of the ListenerType property - it can behave as either!
The following table summarizes this:
In the example above, you used a ListenerType of 3. This meant that OutputPage() is not invoked as each page is rendered and cached by the report engine. After the report run, the method is available for your programs to use to manually output each page to the device of your choice. You can use this to create your own report preview window. More interesting examplesExample: ProofSheetIt is very easy for you to construct a FoxPro form that uses a reference to a ReportListener object to preview a report. Consider the example proofsheet class included in the source files: REPORT FORM HOME()+"\Tools\Filespec\90frx.frx" OBJECT m.rl x = NEWOBJECT("proofsheet","proofsheet.vcx")
x.SetReport( m.rl )
x.Show()
You should see something like this:
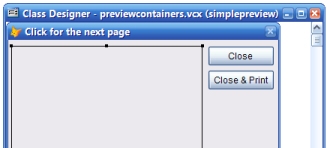
Dismiss the window by clicking the close box and let's modify the class and take a look at the code: MODIFY CLASS proofsheet OF proofsheet.vcx SetReport() method:The SetReport() method stores the listener reference to a property of the form for later use: lparameter oReport THIS.ReportListener = m.oReport Show() method:The Show() method uses the .OutputPageCount[msdn] property of the listener reference to figure out how many canvas Shapes to add to the form: FOR i = 1 to MIN( 36, THIS.ReportListener.OutputPageCount ) THIS.NewObject( SYS(2015), "ProofShape", "proofsheet.vcx" ) THIS.Objects[m.i].PageNo = m.i THIS.Objects[m.i].Top = ... THIS.Objects[m.i].Left = ... : ENDFOR DODEFAULT(nStyle) Note that this code relies on the fact that there are no pre-existing controls on the form in order to refer to each added shape by the Objects[i] array. There is additional code (not shown) that arranges the shapes into rows and columns on the form. Paint() event:This is where the magic happens: The code cycles through all the pages and invokes the OutputPage() method to display each pre-rendered page on the form: IF NOT ISNULL( THIS.ReportListener ) FOR i = 1 to MIN( 36, THIS.ReportListener.OutputPageCount ) THIS.ReportListener.OutputPage( m.i, THIS.Objects[m.i], 2 ) ENDFOR ENDIF Example: SimplePreviewLet's take a look at another simple preview form class, this one called SimplePreview:, included in the source files: MODIFY CLASS SimplePreview OF previewcontainers.vcx This form contains a Shape and two buttons:
In addition to the expected ListenerRef and SetReport() members, this form class also has a PageNo property. Shape.Click() event:This form displays one page at a time. If you direct the code snippet window to the Shape.Click() event, you will see that the preview will advance to the next page when the user clicks on the shape: IF THISFORM.PageNo < THISFORM.ListenerRef.OutputPageCount THISFORM.PageNo = THISFORM.PageNo + 1 ELSE THISFORM.PageNo = 1 ENDIF THISFORM.Refresh() cmdOK.Click()This code introduces another member of the ReportListener class: the OnPreviewClose()[msdn] event. The single boolean parameter indicates whether or not you want the report engine to send the report to the printer for you. Note that I've called it an event. In my opinion, this is the first case of a VFP base class having an event that is only ever called by FoxPro code! Nothing in the product calls it for you. Is it really a method? No! In my opinion, it's an event. Our custom code is "raising an event" that the ReportListener must respond to. IF NOT ISNULL( THISFORM.ListenerRef ) THISFORM.ListenerRef.OnPreviewClose(.F.) THISFORM.ListenerRef = .NULL. ENDIF THISFORM.Hide() cmdPrint.Click()The code behind the Print button is exactly the same as the OK button - except that the OnPreviewClose method is passed .T. instead of .F. Getting the ReportListener to instantiate the preview form automaticallyYou could just demonstrate this preview form like you did the other one. But you know what? It's still too much code to call SetReport() and Show() manually. You can make the report engine talk to your preview form automatically for multiple reports. All you need to do is use a differrent ListenerType. A ListenerType of 1 is what you need. That - and the use of another member property of ReportListener: PreviewContainer[msdn]: rl.ListenerType = 1
rl.PreviewContainer = NEWOBJECT("SimplePreview","previewcontainers.vcx")
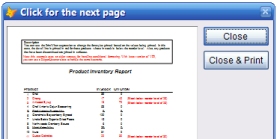
And now kick off another report: REPORT FORM _samples + "\Solution\Reports\colors.frx" OBJECT m.rl Neat:
Click on the shape to advance to the next page. Now try a different report: REPORT FORM _samples + "\Solution\Reports\wrapping.frx" OBJECT m.rl Neat again. Different report - same preview window. No additional object instantiation required. Now click the Close & Print button to confirm that it really will print the report! Introducing the Preview Container APILet's review. What you've really been doing here is implementing something called the "Preview Container API"[msdn]. This is the minimum set of properties and methods that an object must implement in order to be used as a Preview Container by the report engine in VFP 9.0:
It's really that simple - on the outside. As you've seen in the examples above, however, it takes a little more work to implement a truly functional preview window. Changing the default Report Preview windowWouldn't it be nice to be able to write a preview surface that you could use throughout your existing applications, in place of the default Report Preview window? And without using any special new syntax? Well, in VFP 9.0 you can. Introducing _REPORTPREVIEWYou're going to use a system variable new to Visual FoxPro 9.0, _REPORTPREVIEW[msdn]. Similar to _GENMENU, this variable identifies a program. VFP uses _REPORTPREVIEW to identify the preview container factory application. This program is called by Visual FoxPro when:
You would not believe how much easier this is than it sounds: CLEAR ALL MODIFY COMMAND Enter the following code into the program editor: LPARAMETER x
x = NEWOBJECT("SimplePreview","previewcontainers.vcx")
RETURN
Save this program as pfactory.prg. and set it as the value of _REPORTPREVIEW in the Command window: _REPORTPREVIEW = "pfactory.prg" Now set the REPORTBEHAVIOR[msdn] setting to 90: SET REPORTBEHAVIOR 90 (I'm going to talk about this setting shortly, ok? Bear with me here). Now modify a report in the Report Designer: MODIFY REPORT _samples + "\Solution\Reports\colors.frx" Select Print Preview from the Report menu, and if all has gone according to plan, you should see your SimplePreview form, transparently integrated into the Visual FoxPro IDE. What did you just do? You created a preview factory, and told VFP to use it to create preview containers whenever a ReportListener object needs one. It works with all variations of the familiar syntax: REPORT FORM _samples + "\Solution\Reports\colors.frx" PREVIEW Or, if you like, you can change it to use a different style of preview window. You may have noticed that the ProofSheet class from the earlier example also complies with the Preview Container API. Edit the pfactory.prg program thusly: LPARAMETER x
* x = NEWOBJECT("SimplePreview","previewcontainers.vcx")
x = NEWOBJECT("proofsheet","proofsheet.vcx")
RETURN
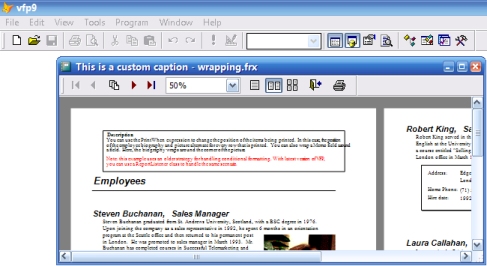
Save the program and run another report: REPORT FORM _samples + "\Solution\Reports\wrapping.frx" PREVIEW Uh Oh. You should still see the SimplePreview form. Why did this happen? On the caching of Listener instancesBehind the scenes, the first time you ran the report with REPORTBEHAVIOR=90, Visual FoxPro instantiated a ReportListener object to assist in the report run. It also asked for a preview container by invoking _REPORTPREVIEW. It then cached the ReportListener [1], and its preview container. You've already seen how that works across report runs. On your second report run, the listener object already has a preview container, and so the report system doesn't re-invoke _REPORTPREVIEW to get a new one. So your revised code hasn't executed yet. This is easy to correct: CLEAR ALL REPORT FORM _samples + "\Solution\Reports\wrapping.frx" PREVIEW Ah, that's better. There's the proofsheet report preview. Obviously, the CLEAR ALL statement is a bit severe. A more gentle way of releasing the cached reference is to do the following: _oReportOutput["1"].PreviewContainer = .NULL. About that SET REPORTBEHAVIOR commandEarlier you used the SET REPORTBEHAVIOR[msdn] command. The transparent integration of ReportListeners and custom preview windows into the traditional REPORT FORM syntax only works if REPORTBEHAVIOR is set to 90. By default, REPORTBEHAVIOR is set to 80 to ensure backward compatibility with existing applications that may assume that the reporting system and preview windows work a certain way. You can still use the new REPORT FORM .. OBJECT syntax to process reports with the new report engine, if you wish. Observe: SET REPORTBEHAVIOR 80 REPORT FORM _samples + "\Solution\Reports\colors.frx" PREVIEW REPORT FORM _samples + "\Solution\Reports\colors.frx" OBJECT TYPE 1 REPORT FORM _samples + "\Solution\Reports\colors.frx" OBJECT _oReportOutput["1"] ReportPreview.App - the default Preview Container FactoryEarlier I talked about a preview container factory. Visual FoxPro 9.0 ships with a default preview container factory application, ReportPreview.App. It returns instances of a default preview container that is used to preview reports. By default, the _REPORTPREVIEW system variable will be pointing to this application: _REPORTPREVIEW = HOME() + "ReportPreview.App" Although it looks very similar to the native report preview window seen in previous versions of VFP, the default preview container is actually an instance of a FoxPro form class. As you should expect, this class supports the Preview Container API, but it also supports additional features that allow you to control its appearance, and even extend its functionality. Controlling the default preview windowThe additional features of the default preview container are well-documented in the help file[msdn], but here's a simple example of how to manually invoke and control the preview window: pc = .NULL. DO (_REPORTPREVIEW) WITH m.pc pc.Caption = "This is a custom caption" pc.TopForm = .T. pc.Top = 75 pc.Left = 75 pc.Height = 250 pc.Width = 550 pc.CanvasCount = 2 pc.ZoomLevel = 3 rl = NEWOBJECT("ReportListener")
rl.ListenerType = 1
rl.PreviewContainer = m.pc
REPORT FORM _samples + "\Solution\Reports\wrapping.frx" OBJECT m.rl You should see the preview window appear with the attributes you have specified:
Pre-Setting the default preview containerNothing prevents you from replacing _REPORTPREVIEW with a custom factory program - myfactory.prg, say - that wraps the ReportPreview.App: LPARAMETER x DO HOME() + "ReportPreview.App" WITH x x.Caption = "My Application Report Preview" x.AllowPrintFromPreview = .F. x.CanvasCount = 2 x.ZoomLevel = 3 RETURN Now, in your applications: _REPORTPREVIEW = "myfactory.prg" SET REPORTBEHAVIOR 90 : REPORT FORM myreport PREVIEW Your applications will feature the customized report preview. Introducing Preview Extension HooksThe default preview container also exposes "hooks" that allow you to extend the existing functionality with your own custom features. These hooks are exposed by assigning a "handler" object to the preview window that will have its methods called automatically as the preview window executes. Unlike project hooks[msdn], the handler object is not instantiated for you: you must instantiate it yourself and hand it to the preview container using the SetExtensionHandler() method. The Handler object must expose a public previewForm property. At the time that SetExtensionHandler() is called, the preview container will assign this property a reference to itself so that the extension handler object can call back to it. Additionally, the Handler object must support the following methods:
For more information, these preview container extension hooks are documented[msdn] in the help file [2]. See the Appendix Changes to the Preview Extension Hooks API in SP1 below for some breaking news. Here's an example that re-uses some code you looked at earlier. Example: proofextendConsider the example proofextend program included in the source files. This extension adds a button to the preview toolbar (and a corresponding bar to the preview context menu) that displays the proofsheet preview form you saw earlier. It does this by adding code that runs at the appropriate points as the preview container "hooks" the methods of the extension handler. First, the class defines a custom DoProof() method that displays the form: DoProof()x = NEWOBJECT("ProofSheet","proofsheet.vcx")
x.SetReport( THIS.PreviewForm.oReport )
x.Show(1)
THIS.PreviewForm.SetCurrentPage( x.Currentpage )
If you looked closely at the ProofSheet class, you would have noticed that clicking on one of the rendered pages sets the .CurrentPage property. This method leverages that by allowing you to use ProofSheet as a glorified "Go To Page..." dialog! Show()This method adds a button to the preview toolbar. The MyButton class definition is in the same source proofextend.prg source file: THIS.previewForm.Toolbar.AddObject("cmdProof", "MyButton")
THIS.previewForm.Toolbar.cmdProof.Visible = .T.
AddBarsToMenu(): DEFINE BAR iNextBar OF (cPopup) ; PROMPT "\<Proof Sheet..." ON SELECTION BAR iNextBar OF (cPopup) ; oRef.ExtensionHandler.DoProof() This method adds a bar to the context menu. Note the oRef variable reference.
So let's put it into action. You need to get an instance of the default preview container using the standard trick you saw earlier, and then invoke the SetExtensionHandler() method, passing it your extension handler object: pc = .NULL.
DO (_REPORTPREVIEW) WITH m.pc
pc.SetExtensionHandler( NEWOBJECT("MyExtension","proofextension.prg") )
Now you plug it into a ReportListener: rl = NEWOBJECT("ReportListener")
rl.ListenerType = 1
rl.PreviewContainer = m.pc
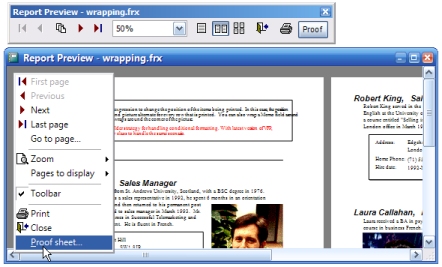
REPORT FORM _samples + "\Solution\Reports\wrapping.frx" ;
  TO PRINTER PROMPT ;
  OBJECT m.rl
You should see the preview window now features a "Proof" button on the toolbar - and an option on the right-click menu:
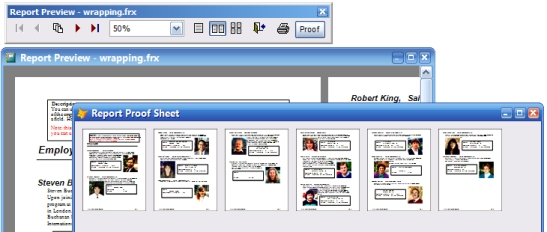
Selecting this option will display the proofsheet window:
You can click on one of the thumbnail pages to go to that page in the main preview window. Here's a last take-away for you: Click on Print button on the toolbar. New in 9.0: the Print Dialog has current page enabled
FinallyI hope this article has given you some insight into how the new report preview features of the reporting system in Visual FoxPro 9.0 work, and also given you some ideas of how to extend it with your own functionality. You can download a zip file containing the example source files for this article here: ReportPreview_extend.zip Footnotes:[1] Exactly how Visual FoxPro obtains and caches ReportListener objects is beyond the scope of this article - but if you are curious, check out the documentation[msdn]. [2] The preview extension API is expanded slightly in Visual FoxPro 9.0 SP1. Also a number of bugs have been fixed. Appendix: Changes to the Preview Extension Hooks API in SP1In VFP9 SP1 a report preview extension handler object no longer needs to implement every method. The ReportPreview application uses reflection (via a PEMSTATUS() call) to only call a hook method if it exists in the extension object. Also, a new hook method, InitializeToolbar(), has been added to ensure that customizations to the toolbar remain persistent even when the user closes the toolbar via the close box and then brings it back with the preview window's context menu option. Properties:.PreviewFormIf this property exists in your class, the Preview assigns it a reference to the preview form itself. This is useful if your code needs to interact with the preview form and/or the toolbar. Methods:.InitializeToolbar()[New in SP1] This hook is called from the preview form's .CreateToolbar() method, immediately after the toolbar object is instantiated. This hook is also called from the top of the preview form's Show(). The toolbar was created in the preview form's Init() which happened prior to the extension object availability. This hook allows the extension object to decorate the toolbar. The toolbar can be referenced through THIS.PreviewForm.Toolbar .Show( iStyle )This hook is called from within the preview form's Show(). .AddBarsToMenu( cPopup, iNextBar )This hook is called at the point that the context menu is being constructed. Any ON SELECTION BAR.. code you implement can rely on a private variable "m.oRef" being in scope that references the preview form itself. This reference is used by the existing context menu bars so you know it's good. .HandledKeypress( iKey, iModifier )This hook is called from the preview form's KeyPress() event. Return .T. if your code has handled the keypress. Return .F. if you want the default key handling code to continue processing the keypress. .Paint()This hook is called from within the preview form's Paint() event, as the last step after the pages have been rendered, and just prior to a DOEVENTS statement. .Release()This hook is called from within the preview form's Release() event. You may return .F. if you wish to prevent the preview form from being released. Acknowledgements:I would like to acknowlege the help of Lisa Slater Nicholls in preparing for this session, and therefore this article as well. Thanks, hon. |
Exploring and Extending Report Preview in VFP 9.0