|
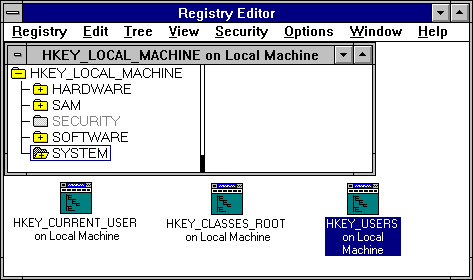
By Colin Nicholls In this article, I discuss the Windows Registry, and access to the registry through Win32 API functions. We'll also look at the design and structure of a re-useable class library that simplifies access of the registry to an acceptable level. With luck, you will find yourself storing application information in the registry routinely without having to look up the complicated syntax of the API functions. Material in this article has appeared previously in various forms in Cobb's Inside Visual FoxPro, and dFPUG's Fuchs magazine. Introducing the Windows RegistryIn the beginning, there were .INI files. And we all know what a pain they were! Originally, Microsoft planned that every Windows developer would include the ability to store application-specific information in the WIN.INI file. The 64k file-size limitation on WIN.INI coupled with the plethora of Windows software made this strategy difficult to maintain. Then, everyone started using their own, private .INI files, but this strategy had its own problems. It made communication between applications difficult, for example. The Registration Database, or Registry, was introduced in Windows 3.1 to facilitate DDE and OLE. In recent versions of Windows the Registry has become much more important and all-encompassing, replacing .INI files, and even CONFIG.SYS as a method of storing configuration information. The Registry StructureThe Windows registry is modelled as a hierarchical organization of information, like a file system with directories and files. "Directories" are called KEYS, and "Files" are called VALUES. Keys are delimited with a '\' character, just like a DOS file specification. Each registry key can hold one or more values, along with one or more branches of sub-keys. The values for a given registry key have unique names. However, each registry key can also have one default unnamed value. Each value can contain some unit of data. In Windows 3.1, a single key defines the top level or "root directory" of the registry. The registry is stored in a file called REG.DAT in the Windows directory. Keys can have only have one (string) value associated with them. The Registry can be viewed and maintained with the REGEDIT.EXE application, also located in the Windows directory. For Windows NT, the registry was expanded to handle the duties formerly carried out by CONFIG.SYS, AUTOEXEC.BAT, INI files, and all the Program Manager GRP files. Additionally, multiple values are allowed for each key, and data types other than string values can be stored. In Windows NT the original tree from the Windows 3.1 registry was retained, under a root level key called HKEY_CLASSES_ROOT. The OS also added three additional root-level keys to the Registry, each defining a separate tree structure within the registry database: HKEY_LOCAL_MACHINE, HKEY_USERS, and HKEY_CURRENT_USER. The original REGEDIT.EXE utility was supplemented with a new version. REGEDIT32 allowed browsing of the new tree structures (see Figure A), unlike the original REGEDIT, which only displays the Win 3.1 compatible tree. Figure A - REGEDIT32 shows you your Windows Registry in NT. In Windows 95, REGEDIT looks slightly different.
Microsoft implemented each successive generation of the registry differently to allow for greater flexibility. (The Windows NT registry introduced multiple values per key, for example.) However, the Win32 API functions that interact with the registry have the same interface across all versions of Windows, allowing us to ignore the differences. What are the root keys?If you run the REGEDIT application in Win95, you will observe that the HKEY_LOCAL_MACHINE root key contains several branches, including CONFIG (for settings in the Configuration Manager), ENUM (for Plug-and-Play support), Security, and System. The Software branch is where applications store information specific to the machine on which they are installed, such as version information, paths to required files, and so on. The HKEY_CURRENT_CONFIG root key (for Windows 95 only) is an alias for a sub-key branch under HKEY_LOCAL_MACHINE, storing information relevant to the hardware profile currently in use. Each time Windows 95 boots up, keys and values from the HKEY_LOCAL_MACHINE\Config\000? sub-tree are duplicated under the HKEY_CURRENT_CONFIG root key. In this way, applications do not have to know which configuration is the current one when they read configuration parameters. HKEY_USERS stores user-Specific information such as Control Panel settings and application window placements. Each user who logs on to the system has a separate branch under HKEY_USERS. A Default key also exists, to provide settings for newly-created users. To make things simple for applications wishing to save user-specific information in the registry, the HKEY_CURRENT_USER root key provides an alias to the branch of HKEY_USERS belonging to the currently logged-on user. The HKEY_CLASSES_ROOT key provides backwards compatibility with the Windows 3.1 registry. (It is actually an alias for the sub-key HKEY_LOCAL_MACHINE\ Software\Classes.) So, what should our VFP applications do?In the Programmer's Guide to Windows 95, in a chapter entitled "Creating Great Applications", Microsoft suggests that applications should register their applications under the HKEY_LOCAL_MACHINE\SOFTWARE key. "Your installation program should include keys for your company name, product name, and version number." In addition, they suggest that "user-specific initialization data" belongs under HKEY_CURRENT_USER\SOFTWARE, and that paths to application-required files should appear under HKEY_LOCAL_MACHINE in the \SOFTWARE\Microsoft\Windows\CurrentVersion\AppPaths branch. "Under this new key, your program should create the Path value name and assign it a path using the same format as that expected by the PATH environment variable." The Guide goes on to mention various other things our applications should do, such as registering icons and print commands. However, we should at least consider using the Registry in place of INI files and other initialization mechanisms. Aside: The DECLARE DLL syntaxHere is a brief reminder of the syntax:
 DECLARE <cFuncType> <cFuncName> ;
    IN <cLibraryName> ;
    AS <cAlias> ;
    <cParamType1> [@]<cParam1>, ;
    <cParamType2> [@]<cParam2>, ;
    ...
The DECLARE command defines an interface between FoxPro and the API functions so that FoxPro-compatable data variables can be passed back and forth between VFP and external 32-bit dynamic link libraries (.DLLs). We have to define the return value type of the function, as well as the type of each of the parameters. The possible data types are shown in Table 1. Table 1 - DECLARE DLL Parameter data types
The actual parameter names (<cParam1> , etc.) are completely arbitrary, and are usually included for readability only. The '@' symbol is used to indicate that a parameter is passed by reference. In other words, the function may pass information back to our program by placing data in the variable. We must also tell FoxPro where to find the function by specifying the DLL in which the function resides, using the "IN <DDLName>" clause. If the API function name happens to conflict with a native VFP function, the AS <alias> clause can be used to change the function name. You can also use the alias to make a function easier to reference in your code, since the actual function names are case-sensitive, and can be long and cryptic. Once we have issued the DECLARE... command, we are free to call the function as though it was native to FoxPro - at least until a CLEAR ALL or CLEAR DLLS statement is executed. Example DECLARE INTEGER WNetGetUser ; IN Win32API ; AS GetLoginName ; STRING, STRING @, INTEGER @ LOCAL lcUserName, lnNameLength, lnResult lnNameLength = 256 lcUserName = SPACE( m.lnNameLength ) lnResult = GetLoginName( 0, @lcUsername, @lnNameLength ) lcUserName = LEFT( m.lcUserName, AT( chr(0), m.lcUserName)-1 ) Manipulating the Registry with Win32 API functionsYou can manipulate the Registry Database using functions in the Win32 API. These functions work almost exactly like the low level file functions FOPEN(), FGETS(), FPUTS(), and FCLOSE() in that they read and write via a handle. In this case, the handle is to a registry key rather than to a file on disk. You can read all about the required API functions in detail in the WIN32API.HLP file included on the VFP 3.0 CD-ROM. Here are some of the ones we are going to use:
We can't just call these API functions as though they were native FoxPro syntax. We have to "declare" the functions so that FoxPro can recognize them. In FoxPro 2.x for Windows we required the FOXTOOLS.FLL library to do this, but in Visual FoxPro 3.0, we can use the new DECLARE...DLL command. Example - Opening a keyBefore we can read data from values in the Registry, we need to "open" the key. This is usually done with the RegCreateKeyEx() function, which has the added feature of creating the key if it does not already exist. Seeing as it is also about the most complex of the API calls we need to use, let's take a look at a real example of the syntax required. REGSTRY1.PRG shows an example of calling RegCreateKeyEx() to open or create a key, in preparation for an application reading or writing values in the Registry. *// REGSTRY1.PRG *// *// The following code opens a key in the *// HKEY_CURRENT_USER tree of the registry, *// or creates it if it does not exist. The *// key is for an application called *// "GenHelp" #include registry.h && useful constants DECLARE INTEGER RegCreateKeyEx IN Win32API ; INTEGER nhKey, ; STRING @cSubKey, ; INTEGER nReserved, ; STRING cKeyClass, ; INTEGER nOptions, ; INTEGER nSecurityAccessMask, ; INTEGER nSecurityAttributes, ; INTEGER @nKeyHandle, ; INTEGER @nDisposition *// Note the "in Win32API" clause. It is a *// shortcut that VFP provides. We don't *// actually have to know where the *// function is actually located (it's in *// ADVAPI32.DLL), because VFP will find it *// for us, provided we know it is one of the *// Win32 API functions. LOCAL lhKey && receives the key handle LOCAL lnDisposition && receives the open method LOCAL lnResult && result code STORE 0 TO lhKey, lnDisposition lnResult = RegCreateKeyEx( ; HKEY_CURRENT_USER, ; 'Software\Cornerstone\GenHelp',; REG_OPTION_RESERVED, ; REG_CLASS_DEFAULT, ; REG_OPTION_NON_VOLATILE, ; KEY_ALL_ACCESS, ; REG_SECURITY_DEFAULT, ; @lhKey, ; @lnDisposition ) IF m.lnResult = ERROR_SUCCESS DO CASE CASE m.lnDisposition = REG_CREATE_NEW_KEY =Messagebox( "A new key was created."+; "Run REGEDIT and take a look.") CASE m.lnDisposition = REG_OPENED_EXISTING_KEY =Messagebox( "An existing key was opened.") ENDCASE DECLARE INTEGER RegCloseKey IN Win32API ; INTEGER nKeyHandle =RegCloseKey( m.lhKey ) ENDIF ENDFUNC The first parameter, HKEY_CURRENT_USER, is a constant containing the pre-defined handle to the root key of the CURRENT_USER tree. There is no easy way to know these - you have to look them up. I found them by looking through header files in the \INCLUDE directory on the Microsoft Visual C++ 4.0 CD-ROM. (Try WINNT.H.) I've extracted a subset of these into REGISTRY.H. For example: *// Root Keys: #define HKEY_CURRENT_USER -2147483647 #define HKEY_LOCAL_MACHINE -2147483646 (All constants used in these examples have been defined in REGISTRY.H.) The second parameter of RegCreateKeyEx(), "Software\Cornerstone\GenHelp", is the sub-key branch we want to open or create. Just like a file specification, we delimit each sub-key with a backslash character. The third parameter, REG_OPTION_RESERVED, is documented as being reserved. All we know is that it must be zero. The fourth parameter, REG_CLASS_DEFAULT, is the class (or "object-type") of key to be created if it does not exist. Passing a null string means that the Windows service will create the key with the default class. If the key is to be created, it can be volatile (only exists until a system re-boot) or non-volatile (is written to disk permanently). The fifth parameter specifies which option to use. The sixth parameter, KEY_ALL_ACCESS, is the desired security access for the new key. The seventh parameter, REG_SECURITY_DEFAULT, normally points to a security attributes structure. However, structures are not supported variable types for Visual FoxPro, so all we can do is pass zero, which will result in the default security descriptor being used in Windows NT (The parameter is ignored in Windows 95, which does not support this level of security.) The last two parameters hold the return values from the function. m.lhKey will hold the handle to the new or opened key; and m.lnDisposition will indicate whether the function opened an existing key, or created a new key. (This is important, because a newly-created key may also require its values to be created and assigned default values.) Creating, reading, and writing key VALUES.We created the HKEY_CURRENT_USER\Software\ Cornerstone\GenHelp key in the registry to store information that the GenHelp application needs to be persistent between sessions. For example, the most recently used hypertext database document could be saved so that when the user next runs GenHelp, the appropriate file could be opened automatically. You can create values and assigned data to them with the RegSetValueEx() function. Let's look at REGSTRY2.PRG, which creates a value called "MRUproject". *//-------------------------------------------- *// REGSTRY2.PRG *// *// This example creates a value called *// MRUproject under the HKEY_CURRENT_USER\ *// Software\Cornerstone\GenHelp key, and sets *// the value to "c:\sample.ghp" #include registry.h *// Declare the API functions: declare integer RegCreateKeyEx in Win32API ; integer nhKey, ; string @cSubKey, ; integer nReserved, ; string cKeyClass, ; integer nOptions, ; integer nSecurityAccessMask, ; integer nSecurityAttributes, ; integer @nKeyHandle, ; integer @nDisposition declare integer RegSetValueEx in Win32API ; integer nKeyHandle, ; string cValueName, ; integer nReserved, ; integer nType, ; string cBuffer, ; integer nBufferSize declare integer RegCloseKey in Win32API ; integer nKeyHandle *// Open the key: local lhKey, lnDisposition, lnResult store 0 to lhKey, lnDisposition lnResult = RegCreateKeyEx( ; HKEY_CURRENT_USER, ; 'Software\Cornerstone\GenHelp', ; REG_OPTION_RESERVED, ; REG_CLASS_DEFAULT, ; REG_OPTION_NON_VOLATILE, ; KEY_ALL_ACCESS, ; REG_SECURITY_DEFAULT, ; @lhKey, ; @lnDisposition ) *// Write the new value: lnResult = RegSetValueEx( ; m.lhKey, ; "MRUproject", ; REG_OPTION_RESERVED, ; REG_SZ, ; "c:\sample.ghp" + CHR(0), ; LEN("c:\sample.ghp") ) =RegCloseKey( m.lhKey ) The RegSetValueEx() function stores data in the value field of an open registry key. If the value does not already exist, it will be created. The first parameter, m.lhKey, must be a valid handle to an existing key. In this example, we open the key with a call to RegCreateKeyEx() and then pass the key handle to RegSetValueEx() via the m.lhKey variable. The second parameter, " MRUproject ", is the Value Label. The third parameter, REG_OPTION_RESERVED, is another of those reserved ones that we don't know about, and don't care. I'm using a #defined constant to remind me what it is for, rather than just a numeric zero value, which has no intrinsic meaning. The fourth parameter, REG_SZ, contains the value type. There are several valid types, defined in REGISTRY.H. Some of these are shown in Table 2. Table 2 - Registry Value types
The fifth parameter, "c:\sample.ghp"+CHR(0), is documented as passing the "address of the value data". From FoxPro, we are limited to what we can pass through to the API. The only combination that really works is to specify a value data type of null-terminated string and then pass a string terminated by CHR(0). Lastly, the sixth parameter indicates the size of the value data being passed. Looking at the resultsIf you run REGSTRY2.PRG and then run REGEDIT32 (If you are running under Windows 95, then you will have to run REGEDIT rather than REGEDIT32), then expand the HKEY_CURRENT_USER tree, you can see the new key and value that you have just created. You should see something similar to that shown in Figure B. Figure B - Expanding the HKEY_CURRENT_USER tree reveals the newly created key and string value.
Next, we are going to look at the design of a visual class library that makes the Windows Registry more accessible. Designing generic functionsIt's important to understand how to DECLARE and use API functions. But, once you have the basics down, you may decide that it's not worth the effort of learning the specific Registry API function syntax to store information in the Registry database. You may be right - even though this process is something you use repeatedly in VFP applications. Instead, if we build a set of generic routines that "wrap" the Registry API and hide it so that we don't need to think about its complexity, we can have our cake and eat it too. The first step in designing a suite of functions or a class is to think about the way we want to interact with it:
Grab a pen and a piece of paper, and for a minute or two, think about the syntax and functions you would like to use in your applications, assuming you wanted to store and recall information to and from the Registry. So what functions do we want?Now let's compare notes on our designs. I initially came up with the first five functions in the list shown in Table 4. On further thought, I considered the case of reading and writing more than one value at a time. For example, reading several user preference values during startup, then writing them back again when they change or when the user exits an application. We ideally need some additional functions that will allow us to keep a key open while we read or write successive values. This will enable us to only open and close the key once, which is more efficient. I came up with four additional functions to facilitate this - also shown in Table 4. Now we are almost ready to start coding. But first: what structure are we going to use to hold our code? A suite of functions in a PRG? A class definition, defined visually or in a program? How are we going to package our generic functionality? I suggest a visual class is the best choice. Figure C - Adding the nLastError property to the visual custom class kRegistry in the Class Designer.
Why a visual class?There are at least three reasons why a visual class best suits our packaging needs: 1. A class allows us to bind related functions together in a tighter, more coherent fashion than merely placing UDFs in the same .PRG file. For example, a call to OpenKey() must be followed by a call to CloseKey(). Placing these methods in a single class definition means that it will be impossible to have one method in scope and not be able to find the other. 2. We can define class properties that are static - data items that persist between calls to the class methods. An obvious candidate is a handle to the currently open registry key. Each method in the class will always be able to see a reference to the currently open key without resorting to parameter passing (let alone public variables!). This will make the methods easier to understand and use. 3. A visual class tends to be easier to use than programmatic classes when you are developing applications. You can drop an instance of a visual class on to a form, and never have to worry about SET CLASSLIB TO .. statements. Launching the Class DesignerIn the "New Class" dialog that appears, type in a class name of, say, "kRegistry", base it on "Custom", and enter a filename of a class library in which to store the class definition (I used "Tools"). Then click on the OK button. The Class Designer will open, containing a little icon representing the custom class, as shown in Figure C. Adding the custom methodsUsing the "New Property" option on the Class menu, add the properties shown in Table 3 to the new class definition: Table 3 - kRegistry Class Properties
You don't have to make them protected, but it's a good idea. After all, there is no reason why these properties should be altered outside of the class, and in fact, it could cause major problems if they were. Table 4 - kRegistry Class Methods
Before you forget, scroll to the bottom of the Property Sheet and change the default initial value of these new properties from .F. to 0. We need to do this to ensure the properties are of numeric type (to avoid "Data type mismatch" errors later on). Now use the "New Method" option on the Class menu to add the methods shown in Table 4 to the class definition. Let's start filling out the method code. (Note that the method code shown here is "bare-bones" only in order to save space. I have not shown comments, variable initialization, and some error checking. The .Init() methodThe .Init() is where we place the DECLARE DLL statements for each of the API functions that we wish to use. This ensures that we can use the registry API functions in any method of the class without re-declaring them:
declare integer RegCreateKeyEx in Win32API ;
    integer nhKey,     string  @cSubKey, ;
    integer nReserved, string  cKeyClass, ;
    integer nOptions,  ;
    integer nSecurityAccessMask, ;
    integer nSecurityAttributes, ;
    integer @nKeyHandle,;
    integer @nDisposition

declare integer RegSetValueEx in Win32API ;
    integer nKeyHandle, string cValueName, ;
    integer nReserved,  integer nType, ;
    string  cBuffer,    integer nBufferSize

declare integer RegQueryValueEx in Win32API ;
    integer nhKey,     string  cValueName, ;
    integer nReserved, integer @nType, ;
    string  @cBuffer,  integer @nBufferSize

declare integer RegCloseKey   in Win32API ;
    integer nKeyHandle

declare integer RegDeleteKey in Win32API ;
    integer nKeyHandle,  string  cSubKey

declare integer RegDeleteValue in Win32API ;
    integer nKeyHandle,  string cValueName
The .GetKeyHandle() methodThe code that obtains a handle to a registry key will be required in a number of different places, so it makes sense to make it a separate, protected method of the kRegistry class. We have already written the basic code for the GetKeyHandle() method (see REGSTRY1 in Listing A.) All we need to do is add parameters to accept the root key handle (thkeyRoot) and subkey path to open (tcSubKey). These are then passed to the RegCreatekeyEx() function, and the key handle returned back to the calling procedure:
lparameters thkeyRoot, tcSubKey
lnResult = RegCreateKeyEx( ;
             m.thkeyRoot, m.tcSubKey, ;
             REG_OPTION_RESERVED, ;
             REG_CLASS_DEFAULT, ;
             REG_OPTION_NON_VOLATILE, ;
             KEY_ALL_ACCESS, ;
             REG_SECURITY_DEFAULT, ;
             @lhKey,  @lnDisposition )

THIS.CheckResult( m.lnResult, ;
                  'RegCreateKeyEx')
return m.lhKey
The .CheckResult() methodTechnically we should compare the return values of each registry function call with ERROR_SUCCESS to ensure that things are proceeding as expected. Since I found myself writing the same code over and over again, it seemed like a good candidate for a subroutine. The resultant method, .CheckResult(), merely assigns the return code to the .nLastError property of the class. (Unless _DEBUG has been #defined as .T. In that case, a MessageBox() dialog informs us that the last function call failed.) .OpenKey() and .CloseKey().OpenKey() needs to open a specific key, and place the handle in the .hkeyCurrent property of the class so that other methods can access it. As you can see, the use of .GetKeyHandle() has made this almost trivial:
lparameters thkeyRoot, tcSubKey

if THIS.hkeyCurrent <> 0
    THIS.CloseKey( THIS.hkeyCurrent )
endif
lhKey = THIS.GetKeyHandle( m.thkeyRoot, m.tcSubKey )
THIS.hkeyCurrent = lhKey
The only thing we have to remember is that if THIS.hkeyCurrent is not equal to zero, then it must contain a handle to a currently open key, which we must close before re-assigning a new key handle to it. This is done by calling the .CloseKey() method. If no parameter is passed to .CloseKey(), it will implicitly close the key referenced by THIS.hkeyCurrent. Otherwise, it will close the key handle passed to it: lnResult = RegCloseKey( m.lhKey ) .WriteValue() and .ReadValue()The .WriteValue() method is very simple, and in fact is basically the REGSTRY2.PRG code we looked at in part 1 of this article. The only difference is that we do not need to open the key, because it has already been opened and assigned to THIS.hkeyCurrent by .OpenKey(). .ReadValue() is slightly more complicated, because it has to cope with the possibility that the requested key value does not exist. In that case, it must create it, and assign a default value.: lparameters tcValueName, tcDefaultValue store "" to lcReturnValue store 0 to lnType, lnResult store space(256) to lcBuffer store len(lcBuffer) to lnBuffersize lnResult = RegQueryValueEx( ; THIS.hkeyCurrent, ; m.tcValueName, ; REG_OPTION_RESERVED, ; @lnType, @lcBuffer, ; @lnBufferSize ) if m.lnResult = ERROR_SUCCESS lcReturnValue = strtran(left( lcBuffer, lnBufferSize), CHR(0), "") else if type( 'm.tcDefaultValue') # 'C' tcDefaultValue = "" endif THIS.WriteValue( tcValueName, tcDefaultValue ) lcReturnValue = m.tcDefaultValue endif return m.lcReturnValue We can now put these four basic methods together to build some higher-level methods. .GetValue() and .SetValue()These methods return data from and assign data values to specific values in specific registry keys by making successive calls to .OpenKey(), .ReadValue(), WriteValue(), and .CloseKey(). They are useful if just one value is required to be saved or recalled from the registry database at one time.
procedure GetValue
   lparameters thkeyRoot, tcSubKey, ;
               tcValueName, tcDefaultValue
   local lcReturnValue
   lcReturnValue = ""
   THIS.OpenKey( thkeyRoot, tcSubKey )
   lcReturnValue = THIS.ReadValue( m.tcValueName, m.tcDefaultValue )
   THIS.CloseKey()
   return m.lcReturnValue
endproc
procedure SetValue
   lparameters thkeyRoot, tcSubKey, ;
               tcValueName, tcValueData
   THIS.OpenKey( m.thkeyRoot, m.tcSubKey )
   THIS.WriteValue( m.tcValueName, m.tcValueData )
   THIS.CloseKey()
   return
endproc
Other methodsThe remaining methods in the kRegistry class shown in Table 4 are essentially wrapper functions around the corresponding Win32 registry API functions. You can examine the kRegistry source code if you wish to look at the methods in more detail. Using the kRegistry classNow that we have constructed the visual class, let's look at some examples of usage. Example 1 Earlier I gave an example of using the DECLARE .. DLL syntax to obtain the login name of the currently logged in network user. Here's an alternate method of obtaining the same information, using our registry class's .GetValue() method to extract the user name from the Registry:
#include REGISTRY.H

set classlib to kRegistry

loRegistry = createobject('kRegistry')

lcUser     = loRegistry.GetValue( HKEY_LOCAL_MACHINE, ;
                                  "Network\Logon", ;
                                  "username", "" )
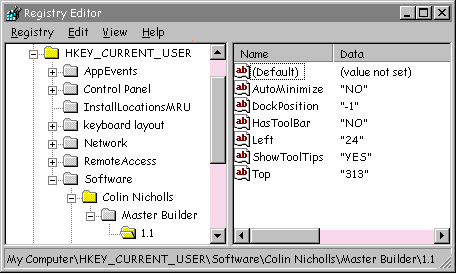
Example 2 MasterBuilder is a developer's tool — a general purpose control builder that assists the construction of forms and visual controls. It requires a number of preferences that persist from session to session. To gain access to the Windows Registry from inside the methods of the MasterBuilder form, I dropped an instance of the kRegistry class on to the form's surface. I called the new object instance "oRegistry". Then, in order to store MasterBuilder's user preference variables in the Registry database, I included the following code in the .SaveOptions() method of the MasterBuilder form: with THIS.oRegistry .OpenKey( HKEY_CURRENT_USER, c_REGISTRY_BRANCH ) .WriteValue( "AutoMinimize", lcAutoMinimize ) .WriteValue( "ShowToolTips", lcToolTips ) .WriteValue( "Top", lcTop ) .WriteValue( "Left", lcLeft ) .WriteValue( "DockPosition", lcToolDockPos ) .WriteValue( "HasToolBar", lcHasToolBar ) .CloseKey() endwith Similarly, to load the preferences for the current user from the Registry, I added code in the .LoadOptions() method, which is called during the MasterBuilder form .Init(): with THIS.oRegistry .OpenKey( HKEY_CURRENT_USER, c_REGISTRY_BRANCH ) lcAutoMinimize = .ReadValue( "AutoMinimize", "NO" ) lcToolTips = .ReadValue( "ShowToolTips", "YES" ) lcTop = .ReadValue( "Top", "0" ) lcLeft = .ReadValue( "Left", "0" ) lcToolDockPos = .ReadValue( "DockPosition", "-1" ) lcHasToolBar = .ReadValue( "HasToolBar", "YES" ) .CloseKey() endwith Figure D shows the Windows 95 registry after running the code. Figure D - The expanded HKEY_CURRENT_USER tree shows the saved user preference values
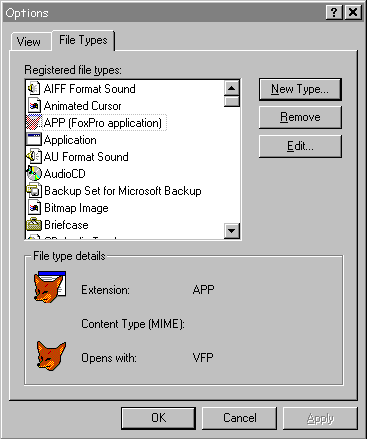
My form-specific header file, BUILDER..H, #includes REGISTRY.H, and also defines various constants used by files in the MasterBuilder project. One of the constants is the location of the "Master Builder" in the Registry: #define c_REGISTRY_BRANCH ; "Software\Colin Nicholls\Master Builder\1.1" These examples show that making use of the Windows Registry can be made very easy. Once the class definition has been constructed, you do not need to keep the knowledge of the naked Win32 API functions in your head. You only need to refer to them when you need to extend the class, as you may need to do if the limitations of it become a problem. Limitations of the kRegistry classThere are a few limitations to the kRegistry class. One is imposed by FoxPro itself: we can only read and write string values to and from the Registry. Most values that require storage can be transformed to a string before calling the kRegistry methods, so this is not a problem. Currently the .ReadValue() method is defining a buffer of 256 bytes to hold the returned value data. This is more than adequate for most string values, but if you attempt to read a data value that is larger that 256 bytes, then RegQueryValueEx() will return ERROR_MORE_DATA (defined in REGISTRY.H) and place the required size in the lnBufferSize parameter. (This is the reason this parameter is passed by reference.) It would be appropriate to enhance .ReadValue() so that the ERROR_MORE_DATA result code is respected, the buffer re-sized, and a second call to RegQueryValue() made. Once we have constructed the class library, it becomes very easy to Registry-enable our VFP applications. I get a kick out of seeing my application's key appear in the Registry, with all the preference information, knowing that it is unique for each individual user of the computer. But wait! There’s more…However, there is a lot more that we can do through the registry than just storage of persistent application information. I will show you how to use the kRegistry class in an application that registers its own file types. We will use this application to integrate Visual Foxpro 3.0 more fully with the Windows 95 Explorer. How Explorer worksEven though it gives users a pleasant way to navigate around their hard drives, the Windows Explorer is little more than a menu system. When you double-click on an application or an application's shortcut, the Explorer executes that application. When you double-click on a data file of a particular type, the Explorer searches the Windows 95 Registry. It looks for "Actions" that define which application is used to access files of that type. The default action, usually called "Open", is to run the application and pass it the data file name as a parameter. You can see a list of file types defined in the registry by selection "Options..." from the View menu in the Explorer window. If you choose the tabbed page offering information about File Types, you see the dialog box as shown in Figure E. (You can reach this dialog box using other methods in Windows 95; it may show slightly different options.) As you see in the figure, file types are associated with Extensions and Content Types. Windows uses filenames' extensions to identify the file types of documents. Content Type designate a specific program as the one you wish to act on each registered file type. Figure E - You can view and edit the list of registered file types by choosing View:Options and selecting the "File Types" page
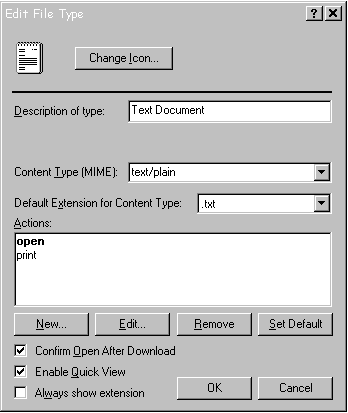
If you double-click on a data file of a type that is not yet defined in the registry, then the Explorer will prompt you to select an application with which the file will be opened. In addition to the standard "Open" action, other verbs can be defined for applications that accept additional parameters. For example, NOTEPAD.EXE offers the verb "Print" via an extra parameter switch "/P". You can see which verbs are currently registered for specific file types by high-lighting a file type in the "Registered file types" list, and pressing the Edit button. (See Figure F.) An application's setup program usually registers these file types as part of normal installation procedures. Unfortunately, Foxpro...When you install Visual FoxPro 3.0, the setup program registers three extensions and associated file types with the VFP.EXE application: .APP, .FXP, and .PRG. Although Foxpro has many different file formats it can create and modify, it can only run programs from the command line. Even if we registered .MNX files with VFP.EXE, double-clicking on MYMENU.MNX would only result in Visual Foxpro 3.0 attempting to compile and run the .MNX file. We can overcome this shortcoming by writing our own FoxPro application, one that does know how to open the various files. We also need to give the application the ability to register these types with itself. This means that we will be able to open menus and forms which currently aren't associated with any application. Figure F - You can edit the command lines for each verb by high-lighting the verb and pressing the Edit button.
Writing our own file openerFoxOpen.PRG is a straight-forward program that knows how to deal with every FoxPro file type passed to it. Here is a simplified example:
*//  FOXOPEN.PRG
*//  This program executes the code required
*//  to open the filename passed to it
*//  appropriately for its type

#include registry.h

lparameters tcFileName, tcType

if parameters() = 0
    do RegisterStuff
    return
endif

*//   change to the directory the file is in:

set default to (substr( tcFileName, 1, rat("\",tcFileName )))

do case
case m.tcType = "TABLE"
    select 0
    use (m.tcFileName)
    browse normal nowait

case m.tcType = "FORM"
    modify form (m.tcFileName) nowait

case m.tcType = "PROJECT"
    modify project (m.tcFileName) nowait

case m.tcType = "PROGRAM"
    modi comm (m.tcFileName) nowait

*//   etc... there are many more types we can do.

endcase
return
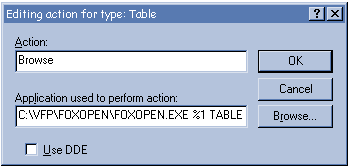
FoxOpen.PRG forms the main program for a FoxPro project. We will build the project into a compact EXE. This code accepts the filename passed to it and opens it using commands that are appropriate to the type passed in via the tcType parameter. Now, somehow we need to get the Windows 95 Explorer to execute "FOXOPEN.EXE mytable.dbf TABLE" when we double-click on the icon representing mytable.dbf. How to register a file typeThe Explorer Options dialog provides an interactive way to register file types with applications. For example, we could register DBF files with C:\VFP\FOXOPEN.EXE by following these steps: 1. Press the "New Type..." button (See Figure A), and select an icon to use to represent DBF files. 2. Press the New... button (See Figure B) and define a new Action of "Browse" 3. Enter "C:\VFP\FOXOPEN.EXE %1 TABLE" in the field marked "Application used to perform action:" (See Figure G). After you apply these changes, double-clicking on a DBF file will launch FoxOpen. FoxOpen will be passed two parameters: the file specification of the DBF file (as represented by the '%1'); and "TABLE". Figure G - Enter the command to execute in response to selecting "Browse" from the context menu of the DBF file.
This process of defining file types and verbs gets tedious and impractical for all the file types that we want FoxOpen to handle. It also would not be an appropriate task for users that need to install your applications. We must add some code to FoxOpen that allows it to register its file types automatically. How to register a file type programmaticallyWe can get the result we want, without using the New Type option of the Explorer dialog, by writing directly to the registry. For example, to register the DBF file type and its associated "Browse" action in the Registry, we must execute the following steps: 1. Create a \DBFfile key under HKEY_CLASSES_ROOT, and assign a value to the key containing the file type description, eg. "DBF/ FoxPro Table" 2. Create a \DBFfile\DefaultIcon key, and assign an icon file specification to the key value. 3. Create \shell\Browse\command keys under the \DBFfile key. 4. Assign the command string "C:\VFP\FOXOPEN.EXE %1 TABLE" to the \command key value. 5. Create a \.dbf key under HKEY_CLASSES_ROOT and assign it the value "DBFfile". I obtained the steps listed above from an article by Teri Schiele entitled "Windows 95 Application Setup Guidelines for Independent Software Vendors" on the January 96 MSDN CD-ROM. After this procedure has been performed, the registry will contain the information required by the Windows Explorer in order to know how to "Browse" a Foxpro table. The RegFileType() procedureHere is the code for a procedure that implements these 5 steps. It uses the kRegistry visual class to register a single file type.
*//   RegFileType()
*//
*//  Parameters:     Example:
*//  -----------     --------------------------
*//  toReg           handle to kRegistry object
*//  tcExtension     ".PJX"
*//  tcFileType      "PJXfile"
*//  tcDescription   "Foxpro Project"
*//  tcIconFile      "ICONS\PJX.ICO"
*//  tcAction        "Modify"
*//  tcCommand       "FOXOPEN.EXE %1 PROJECT"
*//

procedure RegFileType
lparameters toReg, tcExtension, tcFileType, tcDescription, ;
            tcIconFile, tcAction, tcCommand

*//    1. Describe the type:

toReg.OpenKey(HKEY_CLASSES_ROOT,tcFileType)
toReg.WriteValue("",tcDescription)
toReg.CloseKey()

*//    2. Add a default icon:

toReg.OpenKey(HKEY_CLASSES_ROOT, tcFileType+'\DefaultIcon')
toReg.WriteValue("", tcIconFile)
toReg.CloseKey()

*//    3.& 4. Add the commands:

toReg.OpenKey(HKEY_CLASSES_ROOT, tcFileType+'\shell\'+m.tcAction+'\command')
toReg.WriteValue("",tcCommand)
toReg.CloseKey()

*//    5. Create the extension:

toReg.OpenKey(HKEY_CLASSES_ROOT,tcExtension)
toReg.WriteValue("",tcFileType)
toReg.CloseKey()
return
The FOXOPEN.DBF tableThe easiest and most flexible way to store the information to be registered with each file type is in a Foxpro table.. Table 5 - Structure of FOXOPEN.DBF
This table will contain a record for each file type and action that we need to register. We can then write a simple routine that SCANs the table and calls RegFileType() for each record. Here is the code for a routine called RegisterStuff() that does exactly that:
procedure RegisterStuff

set classlib to registry additive

local loReg, lcPath
loReg  = createobject('kRegistry')

*//   Get the directory where FOXOPEN.EXE is:

lcPath = substr( sys(16,1), 1, rat("\", sys(16,1) ))
select 0
use foxopen

scan
    =RegFileType( loReg, ;
        alltrim(foxopen.EXTENSION), ;
        alltrim(foxopen.FILETYPE), ;
        alltrim(foxopen.DESCRIPT), ;
        lcPath + alltrim(foxopen.ICONFILE), ;
        alltrim(foxopen.ACTION), ;
        lcPath + "FOXOPEN.EXE %1 " + alltrim(foxopen.PARAMETER))
endscan

*// (Note that we don't need quotes around the Command line parameters
*//  because this is a parameter passed to an EXE.)

use in foxopen
release classlib registry
return
This routine uses icons stored in an ICONS\ sub-directory of the default FoxOpen directory. As the registry needs a complete path for each of the icon files, I have prefixed the icon filename with the path where FOXOPEN.EXE is installed. The ICONS\ folder should also be in this directory. If you choose not to store icon files in this directory, remember to change the ICONFILE field in FOXOPEN.DBF to reflect the new location. You may also edit the icons to suit your personal tastes, or even replace the icons with your own. If you do this, remember to update the ICONFILE field in the FOXOPEN table! If you take another look at the FOXOPEN.PRG code, you will see that if FOXOPEN.EXE is called with no parameters, then the RegisterStuff() procedure is invoked. This seems like the most practical way to get FOXOPEN.EXE to register its files. You could enhance the program so that it warns the user that it is about to write to the registry. The results, please!After running FOXOPEN.EXE with no parameters, the FoxPro file types will be registered, and should appear in the Windows 95 Explorer next time you open a window, or select REFRESH from the View menu. (See Figure H). Figure H - The Explorer window reflects the "foxy" make-over performed by FoxOpen.
You should be able to experience the new, FoxPro-aware Explorer! When you double-click on a DBF file, FoxPro will be launched and appear with the table visible in a browse window. If you double-click on a SCX form, FoxPro will be launched with the form open for editing. If you wish, you may change the FOXOPEN.PRG code so that double-clicking on a form will run the form rather than editing it. Note: If you do not see the results of the file type registration immediately, try re-starting Windows 95. I have had various results on different installations, but re-starting usually fixed the problem. Warning: If you install other Microsoft Foxpro products - say, the ODBC driver - you may find the Explorer loses some of the file types. This is because the install program of the other program has also written to the registry to install its file types. Simply run FoxOpen again to restore your custom file types. Taking it furtherDue to space considerations, the code described here is a simplified version of what you get on the sample program disk. In addition to handling more file types, it also has a routine to de-register the file types. This is accomplished by deleting the keys created in RegFileType() with the kRegistry method .DeleteKey(). However, there are many other ways to extend FoxOpen to make it even more useful. You could add additional code to register the associated memo files - .FRT, .SCT, etc. - as well as the normal file extension. For example, an .MNT could also be registered as an "MNXfile". This would give the memo files the same icons as their table counterparts in the Explorer. It would also mean that double-clicking on, say, an .SCT file would run FOXOPEN.EXE with the "FORM" parameter. (Because FoxOpen currently expects normal filenames, you will have to remember to change the FOXOPEN.PRG file so that it recognizes the .SCT extension and opens the associated .SCX, rather attempting to open the .SCT.) You could also adapt the FOXOPEN.PRG code to register more than one verb for each file type. For example, right-clicking on an .SCX file could allow you to Modify the screen, Run the screen, or Browse the .SCX file. We have concentrated on an admittedly frivolous example of registering file types. However, I hope you can take the concepts and methods introduced here and apply them appropriately in your own applications. While you're doing that, I hope you enjoy FoxOpen's make-over of the Window Explorer as much as I do. And finally…Exploiting the many operating system services in the Win32 API requires a few things:
As I hope you have seen, it can be a rewarding exercise. You can get the source code for this article here. |
Manipulating the Windows Registry in VFP