|
|
| data... any distance... minimal time |
Appendix A: Introducing Views and remote data accessViewsViews are essentially SELECT … statements that have been stored in the DBC for later use. Once we have defined them, we can USE them as though they were regular tables. Unlike regular cursors created via SELECT statements, they are read/write, which means you can change the values in the cursor, without having to do SELECT.. INTO TABLE and other even more unpleasant tricks.
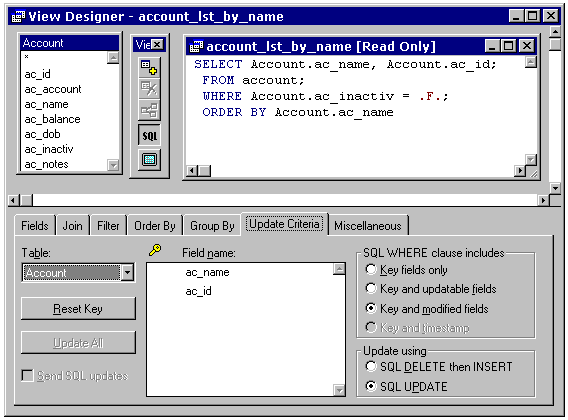
Figure A1. The View Designer Other important things to understand about views:
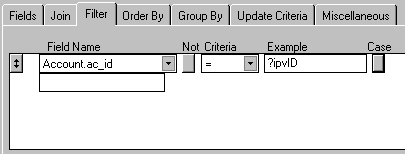
Local ViewsLocal views are views of native VFP tables, whether they are included in a DBC, or are free tables. In VFP we have two ways we can create views: we can use the VFP View Designer tool (See figure A1). Or we can programmatically create them: create database sample1 create sql view account_lst_by_name_2 as ; The FoxPro syntax for creating views can get quite complex, with lots of DBSETPROP() commands being used to set updateable fields and things like that. It is certainly easier to use the View Designer! On the other hand, there are some perfectly useful and valid views that the View Designer is totally unable to construct for you. More on this later. Now that the select statement is stored in the DBC as a view, we can execute it using regular FoxPro USE… commands: set database to sample1 Now take a look in the Datasession window: Notice that VFP has opened the account table at the same time as the account_lst_by_name view. This is to be expected: if you SELECT * FROM account, you understand that VFP opens the local source tables as it executes the selection. Parameterised ViewsBut wait – there’s more. (In a session on FoxPro, you are always going to hear that phrase!) Views can be even more flexible. To save on having to define a separate view for every possible WHERE… clause, VFP allows you to define parameterised views. With parameterised views, you include variables in the view definition that are evaluated at the time you USE the view. You specify the variable by prefixing the filter clause with a ? prefix (see Figure A2.)
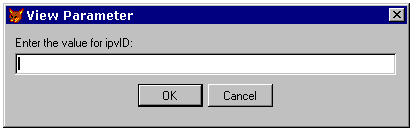
Figure A2. A parameterised view filter condition In code, this view would be define like this: create sql view account_rec as ; The only catch to remember with parameterised views is that the variable in the view definition must be in scope – defined either as a local or private variable – at the time the view is USEd. Otherwise, VFP will prompt you for the value. Let’s see it in action: use account_rec At this point, we will get the prompt shown in Figure A3, requesting a value for the view parameter. Let’s cancel, and define the view parameter variable before we try and use the view: ipvID = 45 You can see the status bar annouce "selected 1 record in 0.04 seconds" or similar. Browse the view and check the record , then assign a new value to the variable and REQUERY(): browse You will see the browse record change as the view is requeried.
Figure A3. VFP prompts for a view parameter The NODATA and NOREQUERY clausesWhat if you don’t know the value of the parameter at the time that you wish to open the view? VFP gives us a NODATA clause to allow us to USE views at the same time as we open other tables – say, in the .Load() of a form – and defer querying the tables for later, using the REQUERY() command. open data sample1 When you USE <view> AGAIN, an implicit REQUERY() is performed unless you specify NOREQUERY: IpvID = 13 Updateable ViewsI mentioned before that one of the great things about views is that we can update the backend tables through the view. Let’s make the account_rec view updateable: set database to sample1
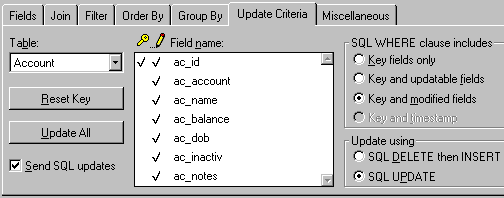
Figure A4. Making the view updateable Using the View Designer, we can make the view updateable by going to the Update Criteria page; selecting the primary key field (put a tick in the column under the key symbol); and clicking on the Update All button. This automatically puts a tick against all fields (except the key field) in the updateable column. We’re still not done, however: place a tick in the Send SQL updates checkbox to ensure that the changes are saved to the back end tables. Now we can save the view definition. The code to do this programmatically is pretty tedious. Here’s a taste: =DBSetProp('account_rec', 'View', 'SendUpdates', .T.)
Let’s try out the updateable nature of the view: ipvID = 24 If you browse the source table account.dbf, you will see that the new value of the AC_NAME field has been saved. Aside: Rules and triggers in the source dbcIf you add a field rule to the source database, then you will find that the rule does not take effect until the TABLEUPDATE() command. Some people advocate using local views for data entry for precisely this reason – the table validation is postponed until the errors can all be dealt with in one place. Here's an example: open database bank
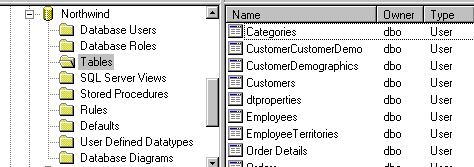
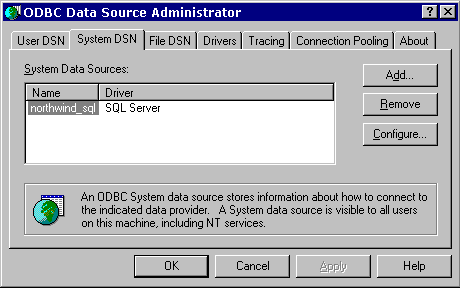
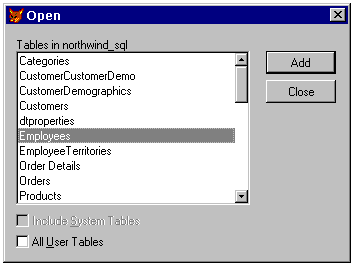
Figure A5. Tables in the NorthWind database in SQL Server Figure A5 shows the tables in the SQL Server example database NorthWind. I've covered the process of creating an ODBC data source elsewhere in these notes, so lets just assume we have one set up to use as a channel to the NorthWind database, as shown in Figure A6.
Figure A6. The DSN to the NorthWind database Now it is time to go back to Visual FoxPro and see how we can access data through this ODBC data source. SQL PassthroughSQL Passthrough (SPT) is a term used to describe the process of passing SQL statements to the back-end database server to execute. Now that we have a ODBC Data Source defined, we can use it in code like this: h = SQLConnect('northwind_sql', 'sa', 'sauron')
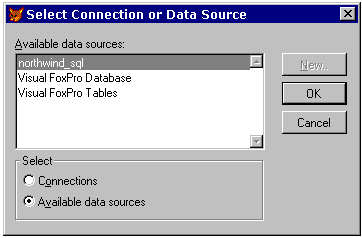
('sauron' is the sa LoginID password.) SQL Server will execute the statement and, if successful, a result cursor (called sqlresult by default) will be opened in the next available workarea. It is a very fast way of retrieving data from the server. The drawback is that – apart from requiring SQL Server login ids and passwords to be referenced in code – the SQL statement must be written in the variant of SQL that the server understands. No embedded VFP functions can be used, for example. More on SQL Passthrough later. Remote ViewsRemote views share a lot in common with local views, except that they are a view of data in a remote data source instead of a native FoxPro table. As such, they are defined a little differently and have some subtle and not-so-subtle differences. Once we have opened and selected a DBC, we can create a remote view by adding the REMOTE clause to the CREATE VIEW command: open database <mysample> Now, instead of asking us to select the tables to be queried (as in a local view), FoxPro prompts us to select a connection or remote data source:
Figure A7. Select a data source for the remote view Let’s keep things simple by choosing the northwind_sql data source that we created earlier. Press the OK button.
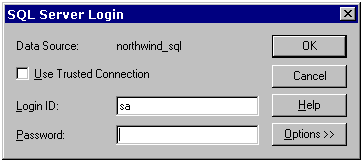
Figure A8. We are required to log in to SQL Server As you can see from Figure A8, as the DSN is accessed, SQL Server requires that we log in. We can enter our login id and password and press the OK button. (Note the "Use Trusted Connection" checkbox. If we had configured SQL Server for integrated security, we would be able to be authorised by our network login id, and we'd tick the checkbox.)
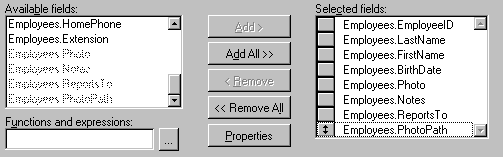
Figure A9. Select a table for the remote view to query FoxPro now presents us with a list of tables in the NorthWind database for the remote view to query from. Let’s keep it simple at this stage and choose fields from the Employees table:
Figure A10. Selecting fields from the NorthWind!Employee database Here we have chosen EmployeeID, LastName, FirstName, BirthDate, Photo, Notes, ReportsTo, and PhotoPath. Now we can click on the close box of the View Designer and save the view as nw_employee_lst. If we now try to USE the view in the command window, two interesting things happen.
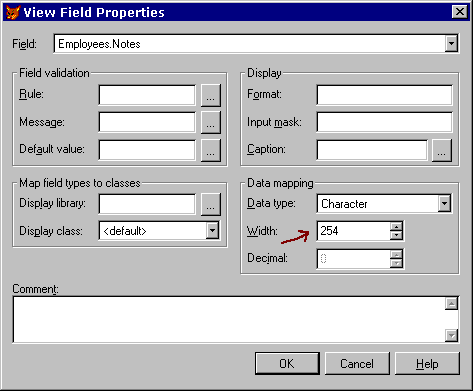
It turns out that the view is trying to represent the Notes field by a char(20) field, and this apparently is not allowed. Data type mappingRemote views support a feature called data type mapping. This feature means that the data type of a field in the remote source table can be "converted" to a different data type in the corresponding field in the view cursor. This feature is configured by pressing the the Properties button of the View Designer (shown in Figure A10). Subsequently, VFP shows the dialog shown in Figure A11. If we override the default data type of the Notes field in the view cursor structure from char(20) to memo, we get a slightly different errror upon trying to save: "Type conversion required by the DataType property for field Notes is invalid.". It turns out that a data type of c(254) will allow us to save the view, but this doesn’t feel very satisfactory. The same problem occurs for the PhotoPath field.
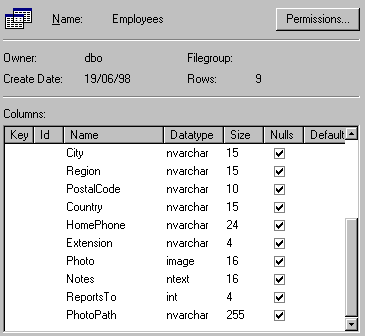
Figure A11. Changing the data type mapping for the Notes field (It turns out, after running SQL Server Enterprise Manager and looking at the structure of the Employees table (see Figure A18) that the Notes and PhotoPath fields are of type nText and nVarChar(255) respectively. The SQL Server 7.0 documentation describes these as new "unicode data types", along with nchar. I don’t remember them being in SQL Server 6.5, or having this problem at the time…)
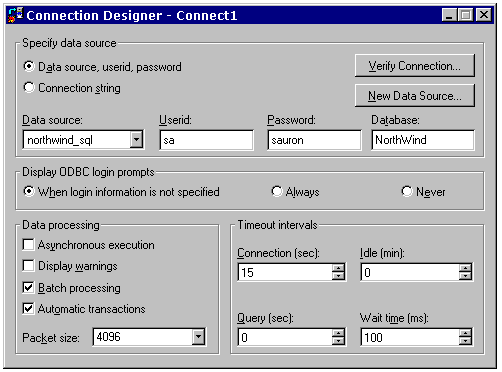
Figure A12. Employee table properties in SQL Server Having adjusted the data types of the Notes and PhotoPath fields in the nw_employee_lst view definition, we can save the view and then try browsing it in FoxPro: use nw_employee_lst You have probably noticed that the login dialog keeps appearing every time we use or modify the view, prompting us to enter the SQL server login ID and password. There has to be a better way! ConnectionsIt turns out that there is a better way. Instead of basing the remote view on an ODBC data source name, we can create something called a named connection which is stored in the DBC, and saves extra information about how to connect to the back-end database. If we base our remote views on a named connection instead of a data source, we won’t have this problem with the extra log in dialogs. We create a named connection in the database using the following commands: open database sample1 This will bring up the Connection Designer (See Figure A13). We can enter the data source name, SQL login id, password, and default database to access, then save the connection with any name we like – say, con_NorthWindSql.
Figure A13. The Connection Designer Now let’s create a remote view using this named connection: open database sample1 create sql view nw_customers ; At this point you will notice that we no longer get that pesky login dialog everytime we USE or MODIFY the view. This indicates to us that for our application, we should probably use views based on a named connection. We can use the connection with SQL passthrough as well: open database sample1
h = SQLConnect('con_northwind_sql')
=SQLExec( h, 'select * from customers' )
=SQLDisconnect( h )
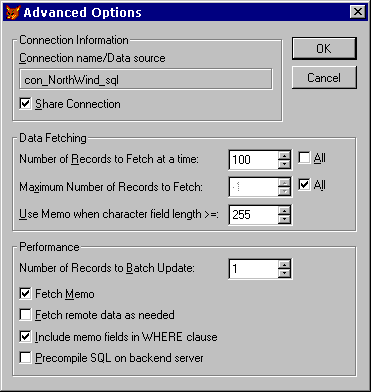
Sharing connectionsYou may have noticed that the CREATE SQL VIEW command used above included a SHARE clause. This is because by default, each remote view you USE will use the named connection to open its own channel to the SQL Server. Each connection channel uses resources on the machine hosting Sql Server. In our application it was not hard to imagine a situation where 10 simultaneous users each opened 3 instances of a modeless form, that in turn opens 6 views – the server would need to host 180 simultaneous connections! And with no decent way of artificially limiting the number of users and/or open forms. We could see that we would have to try and find a way that all our views shared existing connections if possible.
Figure A14. View Designer Advanced Options A warningEven though you may have configured the options on the Remote Data page of the VFP Tools:Options dialog to use shared connections, when you CREATE VIEW REMOTE or use the View Designer, VFP will still create a view that does NOT share existing connections. You must either create it in code using the SHARE clause, or select Advanced Options… from the Query menu (when the View Designer is active) to set the view to share the connection (See Figure A14). This seems to be a very important dialog, as it contains many options that may be relevant to applications requiring the best possible data access performance. Further readingI have not covered the topic of offline views at all. If this sounds like something that would interest you, check out the VFP help file and associated documentation. |