|
By Colin Nicholls Before we startQuite a few of the discussions on the Universal Thread Visual FoxPro forum recently have been on the subject of the new Report Preview screen and how to control it. A particular concern is the behavior of the preview toolbar when a REPORT FORM.. PREVIEW is issued in a topform application. There is a bug in VFP9 (see code to repro here) that causes the associated toolbar to be visible, yet unavailable to mouse clicks. You still have functionality available via the preview window's right-click context menu, but at best this becomes a user-education problem - or you have to use the NOWAIT clause to force the preview to display as a modeless form. (This is not nearly so much of a problem now that we have the NOPAGEEJECT clause on the report form command. Many of the reasons that people think they need a modal preview no longer apply.) Product bugs notwithstanding, in my sessions I have strived to show that the default preview application is just that - a default - and that alternative forms of a preview solution are not only possible, but easy to implement. So today I'm going to show you an alternative user interface for the report preview window that you can take away and customize to your heart's content. Here's an, um, preview
Building the preview frameFirst, let's build the preview frame: we can implement this as a Container control, with a child Shape object providing the target on which we will later render the report pages: *------------------------------------------------ * The preview frame... *------------------------------------------------ define class myFrame as Container Width = 296 Height = 372 Left = 12 Top = 12 SpecialEffect = 1 BackColor = rgb(192,192,192) add Object target as myTarget && see below: enddefine *------------------------------------------------ * ...and its child Shape: *------------------------------------------------ define class myTarget as Shape Height = 330 Width = 255 Left = 20 Top = 20 BackColor = rgb(255,255,255) We will allow the shape to be moved around inside the frame by attaching code to the Shape object's .MouseDown event: procedure MouseDown
lparameters nButton, nShift, nXCoord, nYCoord
offsetX = m.nXCoord - THIS.Left
offsetY = m.nYCoord - THIS.Top
THISFORM.MousePointer = 5
do while mdown()
THIS.Left = mcol(0,3) - m.offsetX
THIS.Top = mrow(0,3) - m.offsetY
enddo
THISFORM.MousePointer = 0
endproc
enddefine
A .MousePointer of 5 will set the mouse pointer to use the NSEW arrows instead of the usual mouse cursor. You can see it in action in the screen shot above. Building the form classNow we have the frame, we can create a myPreview form class and place the frame on it: *------------------------------------------------ * The form class: *------------------------------------------------ define class myPreview as Form add object frame as myFrame && see above Along with the command buttons: add object cmdPrev as myButton ;
with Top=12, Caption = "Previous"
add object cmdNext as myButton ;
with Top=44, Caption = "Next"
add object cmdZoomIn as myButton ;
with Top=96, Caption = "Zoom In"
add object cmdZoomOut as myButton ;
with Top=128, Caption = "Zoom Out"
add object cmdReset as myButton ;
with Top=176, Caption = "Whole Page"
add object cmdClose as myButton ;
with Top=220, Caption = "Close"
The myButton derived class I'm using here is just a template for .FontName, .FontStyle, and .Left position. We'll implement some .Click code shortly. Just be patient. Seeing as we need to interact with the report engine, we will give the form a couple of custom properties: A placeholder for a reference to a ReportListener[msdn] object, and a numeric property for the current page number: Listener = .null. PageNo = 1 The key to creating a report preview form in VFP9 is to use the ReportListener's OutputPage[msdn] method, passing it three parameters:
Since we are rendering to a Visual Foxpro object - THIS.Frame.Target - the device type parameter is 2. We will have the page number in THIS.PageNo, and the ReportListener reference in THIS.Listener, so the full syntax will be: THIS.Listener.OutputPage( THIS.PageNo, THIS.Frame.Target, 2 ) We'll put the full code - with boundary condition checking - into a custom method of the form, OutputPage(): procedure Outputpage()
with THIS
if not isnull(.Listener) and .Listener.PageTotal > 0
.Listener.OutputPage( .PageNo, .Frame.Target, 2 )
.Caption = ;
justfname(.Listener.commandClauses.file) ;
+ " - page " + trans(.PageNo)
endif
endwith
endproc
As you can see, we'll be using the Caption of the form to display the filename and current page number, just to keep things simple. In order to ensure that the report page is rendered whenever the form repaints, we add a call to our custom method in the form's Paint event: procedure Paint()
THIS.OutputPage()
endproc
Get those buttons clickingRemember those command buttons we added to the form? We have a couple for navigating around the report. It's important to take care of boundery conditions. The maximum page number that can be rendered is given by ReportListener.PageTotal: procedure cmdPrev.Click
with THISFORM
.PageNo = max(1,.PageNo-1)
.OutputPage()
endwith
endproc
procedure cmdNext.Click
with THISFORM
.PageNo = min(.Listener.PageTotal,.PageNo+1)
.OutputPage()
endwith
endproc
We also have a couple for adjusting the magnification level of the preview. It's easy: just change the size of the Shape and call OutputPage to repaint: #define ZOOM_SCALE 1.3
procedure cmdZoomIn.Click
with THISFORM.Frame.Target
.Width = int(.Width * ZOOM_SCALE)
.Height = int(.Height * ZOOM_SCALE)
endwith
THISFORM.OutputPage()
endproc
procedure cmdZoomOut.Click
with THISFORM.Frame.Target
.Width = max(17,int(.Width / ZOOM_SCALE))
.Height = max(22,int(.Height / ZOOM_SCALE))
endwith
THISFORM.OutputPage()
endproc
As you can see, we're using some boundary conditions on the smallest size of the Shape, hard-coded to 8.5 x 11 which we should think about some more. In case you get lost in the zooming and moving, a button to reset the size and position of the shape is handy:
   procedure cmdReset.Click
      with THISFORM.Frame.Target
         .Top    = 20
         .Left   = 20
         .Width  = 255
         .Height = 330
      endwith
   endproc
The Close button isn't really needed - the form has a close box that works just fine. But let's add one anyway:
   procedure cmdClose.Click
      THISFORM.Release()
   endproc
Testing so farOK, we're done! let's test it out. First we need to create a ReportListener: rl = newobject("ReportListener")
rl.ListenerType = 3
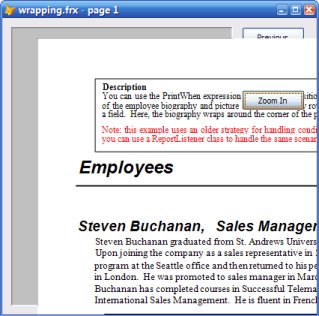
Note that we are using a ListenerType[msdn] of 3. A ListenerType of 1 would cause the default preview container to be automatically invoked, which we do not want in this case: We just want to cache the rendered output for our own use. Now let's get the report engine to feed a report to our listener: report form ? object m.rl Choose any report you like. (I chose _SAMPLES+"\Solution\Reports\wrapping.frx" because it's pretty.) Now we instantiate our UI and assign it a reference to our ReportListener instance, and ask it to show itself: x = newobject("myPreview")
x.Listener = m.rl
x.Show(1)
Hopefully at this point we will have something like the form shown in the screen shot above.
A slight problem
Specifying a clip area for OutputPage()The documentation for the OutputPage method indicates that the additional parameters do not apply to a device type of 2 (2 = Foxpro object). This is not strictly correct. Indeed, the 4th, 5th, 6th, and 7th parameters are ignored, but the nClipLeft, nClipTop, nClipWidth, and nClipHeight parameters are indeed respected by ReportListener.OutputPage() for FoxPro objects. These final four parameters define - in pixels - a "window" or "viewport" on the underlying form, through which the rendered output will appear. Any part of the image being drawn by OutputPage() that lies outside this area will not show up on the form. Fortunately for us, we have a convenient way of determining the placement and dimensions of this clip area: the frame object itself will tell us! Replace the line of code in the the form's OutputPage method so that the additional parameters are specified: * .Listener.OutputPage( .PageNo, .Frame.Target, 2 )
.Listener.OutputPage( ;
.PageNo, .Frame.Target, 2, ;
0, 0 , 0 , 0 , ;
.Frame.Left +2, ;
.Frame.Top +2, ;
.Frame.Width -4, ;
.Frame.Height -4 )
Now the preview form should work as we expect (see screen shot). Exercises for the studentI think I've shown that the possibilities are quite exciting. But we're not done : there are still some additional things that you will need to do before using this code in a production-grade application. You should:
You could also:
And perhaps most usefully, you could also add additional code to the class so that it could be plugged in to Visual FoxPro's reporting system, providing an alternative Preview Container[msdn] when SET REPORTBEHAVIOR 90 is in effect. ...oh, alright then. Here's how it is done: Packaging it up as a Preview ContainerYou will need to add these methods to the myPreview class: *-------------------------------------------
* Methods required for operation
* as a Preview Container :
*-------------------------------------------
procedure Release()
if not isnull(THIS.Listener)
THIS.Listener.OnPreviewClose(.F.)
THIS.Listener = .null.
endif
THIS.Hide()
endproc
procedure Destroy()
THIS.Listener = null
dodefault()
endproc
procedure QueryUnload()
nodefault
THIS.Release()
endproc
procedure SetReport( oRef )
if not isnull(oRef) and vartype(oRef) = "O"
THIS.Listener = m.oRef
else
THIS.Listener = .null.
THIS.Hide()
endif
endproc
You'll also want to put the factory code stub at the top of the file, so you can just point _REPORTPREVIEW directly to the program: *------------------------------------------
* Usage as a preview container:
* _REPORTPREVIEW = "<this program>"
*
* Testing outside of the report system:
* DO <this program>
*------------------------------------------
lparameters oRef
if pcount()=0
   rl = newobject("ReportListener")
   rl.ListenerType = 3
report form ? object m.rl
   x = newobject("myPreview")
   x.Listener = m.rl
   x.Show(1)
return
else
oRef = newobject("myPreview")
endif
return
Enjoy! |
Techniques for Alternative Previews in VFP 9.0