|
By
Colin Nicholls IntroductionIn the past, every time a new release of our favorite development tool has hit our desks, we've had to look forward to the questionable pleasure of learning new syntax and getting our heads around unfamiliar new commands and features. In FoxPro 2.0, for example, we encountered the screen and menu builders, and some of us learned SQL for the first time. This trend certainly didn't change with the release of Visual FoxPro 3.0, which included such new-to-FoxPro concepts such as object-oriented programming support, data buffering, and remote views. VFP 5.0 added some much-needed stability to the product, but didn't really introduce much in the way of new syntax. The newly-released VFP 6.0 adds additional features that allows us to write more sophisticated object-oriented programs. In this article, I will be using the object-oriented programming support in Visual Foxpro 6.0 to go through the process of “wrapping” some of FoxPro's older Xbase commands — specifically those dealing with menus - in a class library. “Wrapping” in this context means surrounding conventional foxpro commands with an object-oriented interface. A library of “wrapper classes” will give you the ability to manipulate FoxPro's menus using the easy-to-learn object-oriented syntax. Along the way we will be discussing many object-oriented programming (OOP) concepts, and I will be assuming that you have heard of the basic concepts of object-oriented programming: inheritance, objects, classes, and sub-classing. You should be comfortable with the use of the THIS and THIS.Parent keywords in VFP method code. Why VFP's object oriented syntax is the last new syntax you'll have to learnIt is my opinion that any development language that surpasses a certain level of complexity and depth of features will have no choice but to become object-oriented. This is because that will be the only way of preventing what used to be called “dBLOAT”, the point at which the programming language contains so many different commands and syntax rules that it becomes very difficult to master. The only way to get a handle on the new features is to give them an object-oriented interface, which will keep the syntax variations to a minimum. The traditional Xbase menu commands that FoxPro has supported in the past are a perfect example of a feature that will benefit from an object-oriented makeover:
Determining the object modelWe are going to design our classes by constructing an object model that matches how a FoxPro menu system looks and behaves. We are then going to implement the classes by providing the internal mechanisms that construct menu components. We want to be able to construct a FoxPro menu system by sending messages to instances of our menu classes. We will be encapsulating the native FoxPro menu commands inside a class library. Figure 1. A simple menu
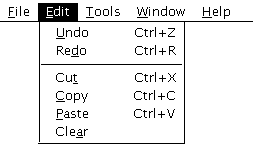
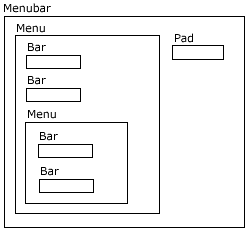
Abstracting and modelling menusThe process of abstraction involves "denoting the essential characteristics of an object that distinguish it from other kinds of objects, providing crisply defined conceptual boundaries relative to the perspective of the viewer."[1] In the case of menus, we need to examine them as they exist in FoxPro and decide what sort of interface we want to use to manipulate them. This will tell us how to construct our wrapper class. Describing FoxPro's menusMenus in FoxPro typically consist of a menu bar, which contains pads and drop-down popup menus. Drop-down menus can contain bars, and other cascading drop-down menus. Menu popups always have an associated pad or bar. (Figure 1 shows a simple menu, in case you have forgotten what they look like.) A menu bar consists of a row of one or more pads. Selecting a pad can pop up a sub-menu, or can directly invoke an external action (like the Over! or Step! Pads of the Trace window menu). Sub-menus consist of a column of bar prompts. Selecting a bar can cause an external action - invoking a dialog for example, or can produce another, cascading sub-menu to appear. One way of modeling the menu system is to say that a menu bar contains pads, and that a pad can contain a sub-menu, and that sub-menus contain bars, and so on. There is a containership hierarchy apparent here. Take forms and grids as an analogy: A form can contain textboxes, and grids. A grid can also contain textboxes, and even other grids, which themselves can contain textboxes. Textboxes are controls, and forms and grids are containers. Container objects can contain other objects - either controls or other containers, whereas control objects can not. This container-control relationship seems to make sense for menus as well. Model the behaviour, not the syntax:If we look past the FoxPro syntax and observe the behaviour of a menu system, we can simplify our model quite a bit. What if we did not know that FoxPro implemented pads, bars, and popups as independent components of a menu system? When users interact with a menu system, they don't make a distinction between the pad or bar that a sub-menu is attached to and the menu itself. We tell them about the File menu and its options. If the Edit pad is disabled on the menu bar, then the associated pull-down menu is also unavailable. We don't have to model our wrapper classes exactly around the native FoxPro commands - after all, we want the classes to model the physical object as closely and as intuitively as possible. Towards this aim, we can arbitrarily decide to model a menu popup and its associated pad or bar as a single object. From an interface perspective we can also treat a standalone menu bar pad and a popup bar as the same kind of object: as a control that invokes an action when you click on it. (This also has the result of keeping the containership hierarchy as shallow as possible, which is another good thing.) This classification decision may require the code inside each class definition to be more complicated than if we had made a different choice, but most importantly: It will result in a clean and simple syntax when we come to interact with the objects from our programs. This is the purpose of encapsulation: to surround and cover the inherent complexity of the implementation with an interface that models the external characteristics of the object. The containership hierarchy of our menu object model is shown in Figure 2. Figure 2. Containership of menu objects
What syntax shall we use?Now that we have a menu object model to work from, we can preview the kind of programming interface we would like to achieve in the class library: oMenu = NEWOBJECT( 'Menubar','menus6' )
oMenu.AddMenu( 'file' )
oMenu.file.AddBar( 'new' )
WITH oMenu.file.new
.Caption = '\<New...'
.Command = 'DO newfile.prg'
.KeyShortcut = 'Ctrl-N'
.Message = 'Create a new file'
ENDWITH
oMenu.AddMenu( 'edit' )
:
oMenu.Define()
NEWOBJECT( cClass, cLibrary, .. ) New to VFP 6.0 is the NEWOBJECT() function. This allows us to instantiate a class without having to SET CLASSLIB TO… first. You can instantiate a programmatic class in a PRG rather than a visual class by specifying a .prg extension on the cLibrary parameter. The base classes in VFP 6.0 also have a corresponding .NewObject() method. (For more examples of the syntax used in constructing a menu system using the class library, take a look at the section Using the Classes below, which explores the use of these classes in depth.) But first, let's concentrate on designing the implementation of the classes in our menu class library. Designing and implementing the classesWe can now define our four basic component classes that we need in order to construct a menu system: _mnuMenubar, _mnuCtrlPad, _mnuSubmenu, and _mnuCtrlBar:
Remember that the _mnuSubmenu class will handle constructing both the popup menu and the pad or bar from which it is activated. These objects will be the building blocks with which we can construct anything from just a single popup, to a complete menu system. This will be done by combining these objects to form an aggregated menu object. Aggregation vs. Inheritance One way of constructing a complex object is by inheritance. This means building a hierarchy of classes, where each successive class inherits the properties and methods of its parent class, while adding new, more specialized functionality. Finally, the object is created by instantiating from the highest level class. An example of this is a Salesperson object. We don't need to know that the salesperson class has been created by successive refinements to subclasses of a mammal class: e.g. mammal --> human --> employee --> salesperson. Another way of building a complex object is though aggregation. A complex object is constructed by combining many less-complex objects together. In VFP, aggregation involves one or more objects being contained inside another. For example, a toolbar is constructed by aggregating controls (usually command buttons) together inside a toolbar container object. In most cases, we use a combination of inheritance and aggregation when constructing objects and classes in VFP. It is important not to confuse our menu objects with the FoxPro menu system itself. Our menu objects are going to contain the necessary information to talk to FoxPro and build the menu system using normal menu commands. They will act as an interface between our programs and FoxPro itself, providing an OO surface on FoxPro's distinctly un-object-oriented menu commands. In designing our class library, we need to bear in mind the environment our classes will be used in. Traditional FoxPro menu commands involve terms like PROMPT and ON SELECTION. VFP objects in the Form Designer have .Captions, and .Click events. Where possible we should design our class library to use the same property names as existing objects in the VFP object model, where suitable analogs exist. This will result in our classes seamlessly integrating with the VFP object model. (There are enough property and method names to remember in VFP already without adding any new ones if we can help it!) For example, we will use .FontName and .FontSize properties to set the appearance of the prompts of pads and bars, a .Style property to determine whether a menu replaces or appends to the system menu, and use an .Enabled property to inform us whether a menu or bar is selectable or disabled. Our classes are going to need methods that do the following:
In addition to these functions, we also need to ensure that the menu system is removed when the menu objects themselves are destroyed. There are other things we could persuade the objects to do, but the above functions are the minimum required. These methods should also be similarly named after analogous VFP object methods:
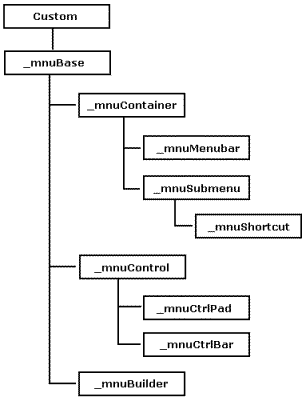
Determining what properties and methods are required and what objects require them is part of the classification process. You must have a good understanding of how objects to relate to each other before you start writing class library code. Abstract classesEvery class definition in VFP must be sub-classed from one of the predefined base classes that come with the product. Since menus don't have a specific base class, we are going to create an abstract class derived from the Custom base class. An abstract class is like a foundation: other classes will be sub-classed from it, but it will never be instantiated directly. Figure 3 shows the class hierarchy we are going to build for our menu class library. Figure 3. The menu class hierarchy
But wait, I hear you ask: VFP provides a base class called Container. Seeing as some of our menu objects are going to contain other objects, why not subclass them from the Container base class? Building a menu system from component objects is going to use memory and resources. We want to limit the number of unused properties and methods as much as possible. The Custom class has less than half the number of basic properties and events that the Container class has, and in VFP 6.0, it has the same useful control collection properties that enable management and referencing of contained member objects. Concept Review: Base class properties, events, and methodsAmong the Custom base class properties, there are several worth examining if you are not familiar with them: The .Class property contains the class name that the object was instantiated from. The .ClassLibrary property contains the name of the class library that the instantiated class belongs to. If you look at Figure 2, you can see that Bar objects are contained inside Menu objects. The .Parent property contains an object reference to the container, providing a mechanism for the object to refer to its parent object. Lastly, .ParentClass returns the name of the class that the object inherits from, not the class of the parent object as you might expect! Let's look at an example: oMenu = NEWOBJECT( '_mnuSubmenu', 'menus6' )
oMenu.AddBar( 'Bar1' )
? oMenu.Bar1.Name
Bar1
? oMenu.Bar1.Class
_mnuCtrlBar
? oMenu.Bar1.Parent.Name
_mnuSubmenu1
*// Let's change it to something different:
oMenu.Name = 'MyMenu'
? oMenu.Bar1.Parent.Name
MyMenu
? oMenu.ParentClass
_mnuContainer
The Custom base class provides a method that adds member objects to a given object of the custom class. The .AddObject() syntax allows us to specify a name for the new member object, which is just as well, because otherwise we wouldn't know what name to use when referring to the object. Examples of a couple of various ways of creating an object may help illustrate this: oMenu = NEWOBJECT( '_mnuDropDown', 'menus6' ) ? oMenu.Name _mnuDropDown1 oMenu.ADDOBJECT( 'MySubMenu', '_mnuDropDown' ) ? oMenu.MySubMenu.Name MySubMenu The Custom base class provides three events that may be invoked at various points in the object's lifetime: .Init(), .Destroy(), and .Error(). The first two events are very important and require some special attention. The .Init() event occurs whenever an instance of a class is created. This could be via a number of different commands: ADD OBJECT oThing AS MyClass THIS.ADDOBJECT( 'oThing', 'MyClass', ... ) oThing = NEWOBJECT( 'MyClass', 'MyModule', 'MyApp'... ) THIS.NEWOBJECT( 'oThing', 'MyClass', 'MyModule', 'MyApp'... ) It is possible to pass parameters to the .Init() code by specifying extra parameters after the class name in the CreateObject() function and .AddObject() method, or after the application parameter in the NewObject() function. The .Destroy() event occurs whenever an object instance is released, either by its object variable being released or going out of scope; or by its parent container object being destroyed. The .Error() event is called whenever a VFP error occurs in method code of the object. (We have added a specialized .Error() event to our classes to handle a specific case, which I will discuss below.) I mentioned earlier that we need to ensure that the menu components created by our objects are removed from FoxPro's menu when the objects themselves are disposed of. Seeing as removing menu components will be performed by the .Release() method, this will be achieved by adding a call to the object's .Release() method to the .Destroy() event. I shall go through the design and structure of each of the class definitions in turn. Sometimes I'll show relevant lines of code, but I recommend looking at the source code along with this section of the article. The _mnuBase abstract classLet's start by implementing an abstract container class that we can use as a foundation for all other menu classes - the _mnuBase class. It can be difficult to see at first what properties and methods belong in an abstract class. Usually we add a method to a more specialised class before we realise that almost every other class is going to want to use it, and then we have to move the method into a class further up the hierarchy - assuming the classes share a common base class! The depressing truth it that it is quite normal to end up re-designing your classes several times over before you settle on a "clean" design. In my current design, the _mnuBase class has these following properties and methods: DEFINE CLASS _mnuBase AS custom
iLastError = 0 && Keep a record of the last error #
cComponentName = "" && Unique menu component name
cChildCtrlClassName = ''
cChildMenuClassName = ''
cChildClassLibrary = ''
.cChildCtrlClassName, .cChildMenuClassName, .cChildClassLibraryIn order to allow subclasses of these menu classes to be used easily, I have added these properties to the _mnuBase class. If they are empty, then the default child class name and class library are used. .Init()The Init() method initialises the .cComponentName property with a name derived from SYS(2015). This unique value is used in constructing FoxPro menu components like POPUPs, MENUs, and PADs. Since almost every other class derived from _mnuBase will be responsible for constructing a FoxPro menu component, it makes sense to place the property here and initialise it at this level. if empty( THIS.cChildClassLibrary ) THIS.cChildClassLibrary = THIS.ClassLibrary endif if empty( THIS.cChildMenuClassName ) THIS.cChildMenuClassname = '_mnuSubmenu' endif .Error()This method will be called in the event an error occurs in any method of any sub-classed object descended from _mnuBase. It stores the value of the error code to the .iLastError property, and displays a MessageBox() dialog informing the programmer of the error. The _mnuContainer abstract classThe next class definition we are going to construct is another abstract container class that will form the foundation for the two container classes _mnuMenubar and _mnuSubmenu. DEFINE CLASS _mnuContainer AS _mnuBase iLastCtrlNumber = 0 .iLastCtrlNumberThis property keeps track of how many member objects have been added to the container. We've sub-classed .NewObject() (See below) to automatically increment this property. Unlike .ControlCount, .iLastCtrlNumber is guaranteed to have a unique value as objects are added. (ControlCount may contain duplicate values if objects are removed as well as added - which can happen.) .NewObject().NewObject has been augmented here to increment .iLastCtrlNumber each time a child object is added. It uses the .cChildClassLibrary property to see if a child class library other than the default has been specified. Also, I have added code to automatically prepend an underscore character to any illegal object name: lparameters tcObjName, tcClass
local lcObjName, liAttempts
lcObjName = m.tcObjName
for liAttempts = 1 to 2
*// Clear the last error flag:
THIS.iLastError = 0
*// call the native .NewObject():
DoDefault( m.lcObjName, tcClass, THIS.cChildClassLibrary )
if THIS.iLastError = 1575
*// Object was not added because of an invalid name.
*// Add an underscore and try again:
lcObjName = '_' + m.lcObjName
else
*// Successful:
THIS.iLastCtrlNumber = THIS.iLastCtrlNumber + 1
exit
endif
endfor
NODEFAULT
return
.AddMenu().AddMenu will be common to all container menu objects (menubars contain dropdown menus, and they in turn can have cascading submenus) so we include it at this level in the class hierarchy, making it available to both _mnuMenubar and _mnuSubmenu, and any further subclasses. lparameters tcName, tcCaption, tnControlNumber *// Add a _mnuSubmenu object to this container, and assign *// it the next available control number (unless a bar *// number has been specified by the tnControlNumber parameter) THIS.NewObject( m.tcName, THIS.cChildMenuClassName ) *// Does NewObject() return .T./.F. ? yes, but you should rely *// on .iLastError for anything serious. *// This relies on the fact that newly-added objects are last *// in the object collection: if empty( m.tnControlNumber ) THIS.Controls[THIS.ControlCount].CtrlNumber = THIS.iLastCtrlNumber else THIS.Controls[THIS.ControlCount].CtrlNumber = m.tnControlNumber endif if not empty( m.tcCaption ) THIS.Controls[THIS.ControlCount].Caption = m.tcCaption endif return The .AddMenu() method uses the method .NewObject() to instantiate a member object of the _mnuSubmenu class. At this point the .Init() event of the _mnuSubmenu object will execute (see below). .RemoveMenu()This method is even simpler that .AddMenu(). All it needs to do is call the base class method .RemoveObject() with the name of the menu to remove. .Destroy()The .Destroy() method must ensure that any FoxPro menu components relating to this object are released, and so we place a call to THIS.Release() here. At this class level we don't actually know what the .Release() method will contain, but descendants of this class will populate that method appropriately.
For nested container objects, it is important to realize
that .Destroy() events are triggered in a specific sequence when the parent
container is destroyed. In the VFP
object model, .Destroy() events are invoked in the order of parent -->
children --> grandchildren, like peeling successive skins off an onion.
.GetMenuName()In the _mnuContainer class, the .GetMenuName() method is just a stub or prototype. .Error()The .Error() method of the _mnuContainer class contains some specialized code to deal with the possibility that an invalid menu or bar name may be passed to the .NewObject() method: lparameters nError, cMethod, nLine THIS.iLastError = m.nError do case case inlist(upper(m.cMethod),"NEWOBJECT","ADDOBJECT") ; and nError = 1575 *// Ignore for the moment. See .AddObject()/.NewObject() above. case inlist(upper(m.cMethod),"DEFINECONTROL") ; and nError = 168 *// Ignore for the moment. See _mnuSubmenu.defineControl() otherwise DoDefault(nError, cMethod, nLine) endcase return The relevant error (1575) is prevented from reporting a regular error message, because we know that the NewObject() method has code to deal with this specific situation (see above). This might seem like a bit of a "hack", and it almost isn't necessary, except that the need for it appeared when I was preparing Example 5 (See Using the classes below). The other error (168 - menu has not been defined) can appear at times when .defineControl() is called in subclasses, but for whatever reason, the parent menu does not exist. In .defineControl() at least, this error is a benign warning. The _mnuControl abstract classThe other two menu classes in our class library - _mnuCtrlBar and _mnuCtrlPad - will be sub-classed from the _mnuControl abstract class: DEFINE CLASS _mnuControl AS _mnuBase Properties of a controlAny property that popup bars and menu pads have in common should be defined at this level. They both have prompt texts, shortcut hot keys, an action that takes place when they are selected by the user, and so on. The declarations in the _mnuControl class definition are setting default values for these properties. The _mnuCtrlPad and _mnuCtrlBar classes, being sub-classed from _mnuControl, will also have these properties, and each will use them appropriately when building menu components. The attributes that we are going to try and support are:
Menu pad/bar result typesIn the VFP menu builder, you are able to define a bar or pad as having one of four result types: Bar #, Command, Submenu, and Procedure. In the object model we are using, _mnuControl objects are only going to support the Bar # and Command result types. (This is not a major limitation: there have been good reasons since FoxPro 2.0 not to use the procedure result type anyway, but to instead call an external routine via a command.) Submenus will be supported by the _mnuSubmenu object. .CtrlNumberThis property will normally be assigned a value from the .iLastCtrlNumber of the parent container object. It will be used as a relative bar number of the control in the container. However, in order to support system bars such as _MED_CUT of the Edit menu, or to use a specific bar number for some reason, you can override this by setting this property to the required numeric value. .CommandThis property is a string containing the command that will be called when you select the control. Placing a line of code in this property is exactly the same as specifying a pad or bar to have a "Command" result type. .Click()In the object model we are using, control objects are the only way we are able to attach calls to routines outside the object, just like control objects on a form. In addition to telling the class what command to attach to each control as it builds the menu system, we can give the class definition a method that directly performs the action. Since this code will be identical for both menu pads and menu bars, we can implement it right here in the _mnuControl class: procedure Click
*// Do whatever would have happened if the user
*// had actually clicked on the pad/bar:
do case
case not empty( THIS.Command )
local lcCommand
lcCommand = THIS.Command
&lcCommand
case not empty( THIS.KeyShortCut )
*// This should work for system
*// bars that don't actually have a
*// "command" as such:
local lcKey
lcKey = THIS.KeyShortCut
keyboard "{&lcKey.}"
otherwise
*// Not sure. If we don't have a key to push on to the
*// buffer, and we don't have a command to execute, then
*// I guess we can't do anything.
endcase
return
This will give us the ability to mimic a menu selection with the following syntax: oMenu.File.Open.Click() .Hide() and .Show()These methods are sort of analogous to the HIDE and SHOW commands in FoxPro. We're going to implement .Hide() and .Show() methods in each of our class definitions, in each case executing the minimum number of commands necessary to "hide" the menu component from the FoxPro environment. Seeing as the commands needed to do this for Controls - pads and bars - is the same, we can implement the methods just once in the _mnuControl class: PROCEDURE Hide( ) THIS.Release() RETURN PROCEDURE Show( ) THIS.Define() RETURN .EnabledIn VFP, you can enable or disable a control by changing its .Enabled property. To give our menu controls the same feature, we will add an .Enabled property to our _mnuControl class. But changing the value of this property alone won't automatically enable and disable the menu bar - we will require some extra code. In 6.0, we can make the code run automatically by adding an assign method to the .Enabled property. VFP 6.0 new feature: Access and Assign methods Access and Assign Methods are new to VFP 6.0. In my opinion they are a most interesting addition to the product, as they enable you to create much more intuitive object interfaces. An access method is a routine that is invoked when a specific property value is read or "accessed". This allows you to implement calculated properties that are always correct when you read them. An assign method is a routine that executes when a value is assigned to a specific property. This is like the power of .InteractiveChange() on any property you like, rather than just .Value! In VFP, these methods are named with the specific property name followed by "_access" or "_assign". Why might you want to run code when a property's value changes? Why not just call a method directly? Odd as it may seem at first, this facility is very useful. Take for example, a graphical thermometer control that indicates a numeric temperature value by the length of a bar graph. It has a .nTemperature property that stores the temperature in degrees Kelvin. You can programmatically find out what temperature it is displaying by: ? oThermo.nTemperature If, however, you wish to change the temperature value, you have to set the .nTemperature property and the size of the graphical shape independently, or define a method to set both the value and the display: oThermo.SetTemperature( 300 ) This is not very intuitive to use. An assign method would allow you to attach code that updated the graphical display as you update the temperature value: oThermo.nTemperature = 45 There are many cases where setting a single value is a better model of reality than calling a method. .Enabled_Assign()We can use the VFP 6.0 support for Assign methods to construct a menu control interface analogous to that of regular VFP controls. We will be able to enabled or disable a menu bar by code similar to: *// Disable the menu: oMenu.SubMenu.Enabled = .F. By default, the assign method is populated by the following code: lparameter vNewValue * ToDo: modify this routine for the assign method: THIS.Enabled = m.vNewValue return Subclasses of this class will need to extend this method so that the Foxpro menu components are made to be enabled or disabled (see below). .Caption_Assign()In the same way, we can add an assign method to the .Caption property to automatically refresh the Foxpro menu component: lparameter tcCaption THIS.Caption = m.tcCaption THIS.Define() && automatically refresh the bar or pad return .Release()Both the .Hide() method and the .Destroy() event make calls to the .Release() method, even though we don't have any actual code to put in the .Release() method at this level. The _mnuMenubar classMenu bars are containers; they contain pads and/or menu popups. Therefore we will start by subclassing our _mnuMenubar class from the _mnuContainer class we defined earlier: DEFINE CLASS _mnuMenubar AS _mnuContainer Style = n_MNU_APPEND && see Menus6.h ToolbarClass = "" && Toolbar class name ToolbarLib = "" && Toolbar class library name MNXFile = "" && file that the menu is && instantiated from Window = "" && window to create the menu in && (optional) cChildMenuClassName = '_mnuSubmenu' cChildCtrlClassName = '_mnuCtrlPad' .StyleAn attribute of menu bars that is not shared by menu popups is how the menu actually attaches itself to the FoxPro system menu. We are going to use a property called .Style to control the different ways the menu can be defined: whether it replaces the system menu or adds to it. By default, we will assume that the menu appends to the current system menu. .ToolbarClass, .ToolbarLibraryThese properties can be used to associate a toolbar class with the menubar that is displayed and hidden along with the other menu components. See the source code of .ShowToolbar() and HideToolbar() for details. .Init()The first thing that happens when we create an instance of the _mnuMenubar class is that the .Init() event is invoked. In the _mnuMenubar class, and indeed, in each of our end-use, instantiable classes, the code in the .Init() event is going to be used to optionally initialize some of the common properties at the time that the object is created: PROCEDURE Init( nStyle ) IF NOT DeDefault() && Always call back to the parent class return .F. ENDIF IF NOT EMPTY( nStyle ) THIS.Style = nStyle ENDIF RETURN .AddPad()Because _mnuMenubar is a subclass of _mnuContainer, all of the properties, events, and methods we placed in the _mnuContainer class definition are available as PEM's of the _mnuMenubar class. This means we don't have to define another method to create a child menu object -.AddMenu() is already defined and in scope. Only menu bars contain pads, however, so we need to define a specific method of _mnuMenubar called .AddPad() that performs this operation: procedure AddPad lparameters tcName, tcCaption *// Add a _mnuCtrlPad object to this container: THIS.NewObject( tcName, THIS.cChildCtrlClassName ) *// Assign a .CtrlNumber by default.(Even though Pad objects *// don't really use BarNumber/CtrlNumbers as such). THIS.Controls[ THIS.ControlCount ].CtrlNumber = THIS.iLastCtrlNumber if not empty( m.tcCaption ) THIS.Controls[ THIS.ControlCount ].Caption = m.tcCaption endif return .Define()Up until now, all we have done is decided what objects we need and what information they need to store in order to be able to construct FoxPro menu components. The fun begins when we implement methods to actually create the menu components on the system menu. The .Define() method, named for the commands it encapsulates, must construct the menu: procedure Define lparameter tlOptimize *// The tlOptimize parameter is passed to *// the child objects. If tlOptimize is .T., *// then popups will not be re-defined if they *// already exist. *// Construct the menu components: do case case THIS.Style = n_MNU_REPLACE push menu _msysmenu set sysmenu to set sysmenu automatic case THIS.Style = n_MNU_NORMAL define menu (THIS.cComponentName) case THIS.Style = n_MNU_INWINDOW define menu (THIS.cComponentName) in window (THIS.Window) case THIS.Style = n_MNU_INTOPFORM define menu (THIS.cComponentName) in (THIS.Window) BAR case THIS.Style = n_MNU_APPEND *// Nothing to do! Additional pads *// will be constructed by the child *// menu objects... endcase This is where the member object collection of the Custom base class we talked about earlier starts to work for us. The _mnuMenubar class inherits the child collection properties and can use them to invoke each of the child object's .Define() methods in turn: *// Call the child object .Define() methods in order *// to construct the rest of the menu structure: for each loControl in THIS.Controls loControl.Define( m.tlOptimize ) endfor I took the liberty of adding code to manage an associated toolbar for the menu. Here, the toolbar will be created and displayed at the same time as the menubar object creates the FoxPro menu components: *// If the menu has an associated toolbar, *// create it: THIS.ShowToolBar() return .Hide() and .Show()An object instantiated from the _mnuMenubar class has no visual component, so no commands are required to "hide" or "show" it. However, we have to pass the message on to the member objects, which do have a visual component, and must execute appropriate code: procedure Hide
*// Send a Hide() message to all child
*// objects:
for each loControl in THIS.Controls
loControl.Hide()
endfor
*// Hide the toolbar if it exists:
THIS.HideToolBar()
return
endproc
procedure Show
lparameter tnStyle
*// Although this class has no need of the parameter,
*// member objects may use it (not in this classlib,
*// but, in principle, we should pass the parameter
*// down the hierarchy.
*// Send a Show() message to all child
*// objects:
for each loControl in THIS.Controls
loControl.Show( m.tnStyle )
endfor
*// Show the toolbar if it exists:
THIS.ShowToolBar()
*// Show the menu - if the type demands it:
do case
case THIS.Style = n_MNU_INTOPFORM
activate menu (THIS.cComponentName) nowait
endcase
return
endproc
The child collection is once more the mechanism by which the message is passed on to the member objects. .ShowToolbar(), HideToolbar()These methods are fairly straightforward. We can call .NewObject() to create an instance of the class specified by .ToolbarClass and .ToolbarLibrary to add a toolbar to the menubar object. .GetMenuName()We can't always determine the name of the FoxPro menu component by reading THIS.Parent.cComponentName, as this following method demonstrates: procedure GetMenuName
local lcMenuName
do case
case inlist( THIS.Style, n_MNU_REPLACE, n_MNU_APPEND )
lcMenuName = '_msysmenu'
case inlist( THIS.Style, n_MNU_NORMAL, ;
n_MNU_INWINDOW, n_MNU_INTOPFORM )
lcMenuName = THIS.cComponentName
endcase
return (m.lcMenuName)
Sometimes, the menu name will be "_msysmenu", if the menu style is REPLACE or APPEND. Encapsulating this information into a method of _mnuMenubar is a good idea, because then member objects won't need to query their parent object's .Style property - they can just call Parent.GetMenuName() to return the name. (See _mnuSubmenu:Enabled_Assign() below.) .Release()The reverse process is performed by the .Release() method. Menus should be dismantled from the inside out - bars on the lowest level submenu should be released, followed by the menu popups, and lastly the menu pads. The .Controls[] collection is again invaluable: procedure Release
*// Call the child .Destroy() methods
*// so that the menu release code is
*// called in the correct order:
*// from inside out:
for each loControl in THIS.Controls
loControl.Release()
endfor
*// Now release the menu components:
do case
case THIS.Style = n_MNU_REPLACE
pop menu _msysmenu
case inlist( THIS.Style, ;
n_MNU_NORMAL, ;
n_MNU_INWINDOW, ;
n_MNU_INTOPFORM )
release menu (THIS.cComponentName)
case THIS.Style = n_MNU_APPEND
*// No action is required.
endcase
return
.MNXfile, .LoadStructureFromMNX()We will come back to this method and property later on. It is enough to say at this point that we will want to be able to create a menu by creating instances of menu componenet classes, and reading the structure from an .MNX file. (See the _mnuBuilder class factory further down.) The _mnuSubmenu classWe made a design decision earlier on that the class used to represent the submenu level of the menu structure would encapsulate both the menu popup itself, and the menu pad or popup bar that it was activated from. Because of this, the class - _mnuSubmenu - actually requires most of the properties that have been defined in the _mnuControl class definition, and also requires a member object collection (for the bars of the popup). So: should we subclass _mnuSubmenu from _mnuContainer? Or _mnuControl? or neither? Or perhaps both: DEFINE CLASS _mnuSubmenu AS _mnuContainer, _mnuControl Perhaps if Visual FoxPro supported multiple inheritance, this would be a reasonable solution. However, multiple inheritance is not supported in version 6.0, so we must find another way. We could try aggregation: DEFINE CLASS _mnuSubmenu AS _mnuContainer ADD OBJECT control AS _mnuControl On the surface, this seems to be a reasonable strategy, but if you work it through you will soon realize that this will result in a rather complex and non-intuitive syntax for users of the submenu class. This would work against what we are trying to achieve in this class library. So as a compromise we're going to solve the problem by redundancy: We'll subclass it from _mnuContainer, but add the extra properties and methods directly in to the class definition at the _mnuSubmenu level[2]: DEFINE CLASS _mnuSubmenu AS _mnuContainer CtrlNumber = 0 Caption = "(New)" : cChildMenuClassName = '_mnuSubmenu' cChildCtrlClassName = '_mnuCtrlBar' : For a comprehensive look at all the methods and properties of this class, you should check out the source code. The methods we're looking at here are just the more interesting ones. .AddBar()Only objects which inherit from _mnuSubmenu will can contain bars, so the .AddBar() method is defined here, at this level in the class hierarchy. It is essentially identical to the .AddPad() method of the _mnuMenubar class, except that it has an additional parameter to optionally allow you to specify a specific bar number to use: procedure AddBar lparameters tcName, tcCaption, tnBarNumber *// tcName - desired object name
*// tcCaption - prompt text of the bar
*// tnBarNumber - control number or system bar name
*// Add a _mnuCtrlBar object to this container, and assign
*// it the next available control number (unless a bar
*// number has been specified by the tnBarNumber parameter)
THIS.NewObject( tcName, THIS.cChildCtrlClassName )
if empty( m.tnBarNumber )
THIS.Controls[ THIS.ControlCount ].CtrlNumber = ;
THIS.iLastCtrlNumber
else
THIS.Controls[ THIS.ControlCount ].CtrlNumber = ;
m.tnBarNumber
endif
if not empty( m.tcCaption )
THIS.Controls[ THIS.ControlCount ].Caption = m.tcCaption
endif
return
endproc
.DefineControl() and .ReleaseControl()Here, I have split off the code required to define and release the control component of the _mnuSubmenu object into two separate protected methods - .DefineControl() and .ReleaseControl(). This has been done for two reasons:
These methods are lengthy but do not contain any special code. They are verbose mainly because they have to determine whether or not they are dealing with a DEFINE PAD or a DEFINE BAR syntax. See the source code for details. .Define()This method must construct both menu components: the menu bar or pad, and the popup itself. By checking the return value of the native FoxPro function POPUP() we can decide whether or not we need to define the popup. This will help make the code more optimized. procedure Define lparameter tlOptimize *// Only construct the component if *// it does not already exist: if not m.tlOptimize or not popup( THIS.cComponentName ) *// Construct the Pad/Bar component: THIS.DefineControl() *// Define the actual popup: if THIS.Relative define popup (THIS.cComponentName) margin relative else define popup (THIS.cComponentName) margin endif *// Call the child object .Define() methods in order *// to construct the rest of the menu structure: for each loControl in THIS.Controls loControl.Define( m.tlOptimize ) endfor endif return endproc Note that although .Margin has been defined as a logical property of the _mnuSubmenu class, we're not currently supported it. If you wanted to add support for .Margin and other popup clauses, you may want to use this alternate code: lcMargin = iif(THIS.Margin, 'margin', '') lcRelative = iif(THIS.Relative, 'relative', '') : etc define popup (THIS.cComponentName) &lcMargin &lcRelative In the interests of optimising speed, I decided to only support essential popup clauses and to not use macro expansion. .Enabled_Assign()Remember the .GetMenuName() method of the _mnuMenuBar class? This is where we get to use it: procedure Enabled_Assign
lparameter tlEnabled
*// Determine whether or not
*// we are attached via a pad a menubar,
*// or via a bar to another popup:
local lcMenuName
lcMenuName = THIS.Parent.GetMenuName()
do case
case upper(THIS.Parent.Class) == '_MNUMENUBAR'
set skip of pad (THIS.cComponentName) ;
of (lcMenuName) !m.tlEnabled
case upper(THIS.Parent.Class) == '_MNUSUBMENU'
set skip of bar (THIS.CtrlNumber) ;
of (lcMenuName) !m.tlEnabled
endcase
THIS.Enabled = m.tlEnabled
return
endproc
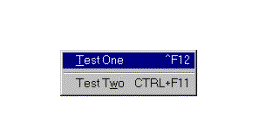
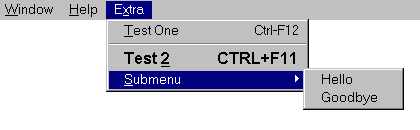
.Caption_Assign()Just like the _mnuControl class, we can add an assign method to the .Caption property to automatically refresh the Foxpro menu component: lparameter tcCaption THIS.Caption = m.tcCaption THIS.DefineControl() && refresh the associated bar or pad return .GetMenuName()For _mnuSubmenu, this method is trivial: it just needs to return THIS.cComponentName. However, we need to implement this method for this class. The .Enabled_Assign() method described above doesn't know whether its parent container is a menu bar (needs to use THIS.Parent.GetMenuName()) or a popup (it could just use THIS.Parent.cComponentName). This way, it doesn't have to know what class of container it belongs to - it can use THIS.Parent.GetMenuName() consistently whether it is attached to a menu bar or another submenu. .Release()The _mnuSubmenu class also needs a .Release() method that, when called, will remove the menu components: procedure Release *// Only execute the release code for the popup *// if the popup has been constructed: if popup( THIS.cComponentName ) *// Call the child .Release() methods *// so that the menu release code is *// called in the correct order: *// from inside out: for each loControl in THIS.Controls loControl.Release() endfor *// This is a menu; therefore there *// are two physical things we have to *// clean up: the menu popup itself, *// followed by the pad or bar it was attached to: release popup (THIS.cComponentName) endif *// Release the associated bar or pad: THIS.ReleaseControl() return endproc .RemoveBar()The .RemoveBar() method simply invokes the base class .RemoveObject() method. .Hide() and .Show()In order to show or hide a _mnuSubmenu object, we only need to show or hide the control component of the menu. This is made extremely simple by the decision to separate out the code that defines the control component of _mnuSubmenu from the menu component. (See .DefineControl() above.) Removing only the associated Pad or Bar control will ensure that the entire menu is "hidden": PROCEDURE Hide( ) *// We don't need to go to any more lengths *// to hide the menu - removing only the *// associated control (Pad or Bar) will *// ensure that the menu is "hidden". THIS.ReleaseControl() RETURN ENDPROC PROCEDURE Show() THIS.DefineControl() RETURN ENDPROC Note: Even though the popup isn't visible, hot key shortcuts may be active. If this turns out to be a problem, then this code may have to be changed so that the popup is released and restored along with the bar or pad to which it is attached. (Change the calls to .ReleaseControl/DefineControl in the methods to .Release/.Define instead.) The _mnuCtrlPad and _mnuCtrlBar classesThese two classes are the simplest class definitions, containing only .Define(), .Enabled_Assign(), and .Release() methods. There are no surprises here - the code to implement the methods is remarkably ordinary FoxPro code. See the source code if you're curious. The _mnuShortcut classIn order to support free-standing popups of the sort we would normally not use the menu builder for, we can subclass the _mnuSubmenu class and specialize further: DEFINE CLASS _mnuShortcut AS _mnuSubmenu Row = 0 Col = 0 The two new properties (.Row and .Col) allow us to specify a default position at which the popup will appear when activated. We must override the default .Define() method (otherwise inherited from the _mnuSubmenu class) to support the added syntax: DEFINE POPUP (THIS.cComponentName) ; FROM THIS.Row, THIS.Col ; MARGIN RELATIVE SHORTCUT In addition to the methods inherited from the _mnuSubmenu class, .Show() and .Hide() methods are added to the _mnuShortcut class definition. Since these methods merely wrap the ACTIVATE POPUP and DEACTIVATE POPUP commands, you may ask why they are not named .Activate() and .Deactivate() respectively. I stated the reason for this earlier - that we should choose method and property names appropriately where analogues exist in the VFP object model. The nett effect on the FoxPro environment is that the popup is being hidden, and then showing itself, and since the idea is to encapsulate the implementation inside the class, surely the actual code syntax required shouldn't affect our choice of method names? You are going to encounter many other situations when designing your own classes where the choice of method names is largely arbitrary. As long as you are consistent in the way you design your object model, you will minimize any potential confusion by programmers who use your classes. The _mnuBuilder classAs an added bonus, you will find one more class in the menus class library. This class is called _mnuBuilder, and although it is subclassed from _mnuBase, it is not a "menu component" class as such. It contains methods that read FoxPro's .MNX file format and build an object-oriented version of the menu, by creating instances of the other _mnu* classes. (Thanks to to Walter Nicholls who wrote the original version of these methods.) I think it is beyond the scope of this article to explore the details of these methods. As you will see when you work through the examples below, they are so useful that I had to include them. Check out the source code for details if you are curious. It is basic FoxPro code, the only interesting aspect of which is that needs to understand the details of the MNX file format. Using the classesThat completes the design and implementation of the Menu wrapper class library - now let's have some fun and see how they can be used! Note: In previous versions of this article I provided two versions of the class library: a programmatic version in MENUS5.PRG, and a visual class version in MENUS5.VCX. When I revised this article for VFP 6, I did not update MENUS5.PRG and I removed it from the source zip. The programmatic class library was possibly easier to learn from while reading this article, but in practice I found the VCX version more useful in real-world situations. You may agree with me after working through the following examples. Example 1: A simple stand-alone popupTypically, the first and simplest example uses the last class definition we created: we're going to use the _mnuShortcut class to implement a simple popup. First we define a variable to use as our handle to the popup object. The variable is declared public so that it remains in scope after the example program has finished executing. Then we can call the object's methods (or, in OOP-speak, "send messages to the object") from the command window. PUBLIC oPopup We then create an instance of the _mnuShortcut class and place the handle to the new object into the public variable: oPopup = NEWOBJECT( '_mnuShortcut', 'menus6.vcx' ) WITH oPopup .Row = 10 .Col = 10 ENDWITH The WITH … ENDWITH syntax allows us to set the values on a selection of the object's properties in one statement. The great thing about the object syntax is that it is self-evident, and needs very little documenting. Let's add some bars to the menu object. We do this by invoking the .AddBar() method of the popup object: oPopup.AddBar( 'test1', '\<Test One', 1 ) We're using the .AddBar() method parameters to specify the bar object name, the bar prompt, and the bar number. The other properties of the bar object must be set separately: WITH oPopup.test1 .Command = "wait window 'Hello test one'" .Message = "This is test one's message" .KeyShortCut = "Ctrl-F12" .KeySCText = "^F12" ENDWITH Let's add a separator and another bar to the _mnuPopup object: oPopup.AddBar( 'separator1', '\-', 9 ) oPopup.AddBar( 'test2', 'Test T\<wo', 2 ) WITH oPopup.test2 .Command = "wait window 'Hello two test'" .Message = "This is test two's message" .KeyShortCut = "Ctrl-F11" ENDWITH Note that we're using specific bar numbers: 1, 9, and 2. The menu will be constructed with the RELATIVE clause, so that the bars will appear in the order that they are defined. (The bar number parameter is optional: our classes know how to assign consequtive bar numbers automatically.) Now that the object knows all about what menu component it is supposed to construct, let's send a message to the oPopup object that tells it to define the menu: oPopup.Define() Because the popup is not attached to the system menu, it does not activate the menu until we invoke its .Show() method: oPopup.Show() The popup should now appear, complete with prompts, messages in the status bar, and shortcut keys (See Figure 4). Figure 4. Example 1
Click outside the popup to deactivate it, and try the following commands from the command window: DISPLAY OBJECTS oPopup.Test2.Click() oPopup.test2.Caption = "Something Else" oPopup.Show() oPopup.test2.FontSize = 14 oPopup.Refresh() oPopup.Show() DISPLAY OBJECTS will show you the class hierarchy tree, the properties, events and methods, and member object names of the oPopup object. The .Click() method will perform the same action as though you had selected the "Test Two" bar from the popup. Here are some more things to try: oPopup.RemoveBar('separator1')
oPopup.Show()
oPopup.Relative = .F.
oPopup.Refresh()
oPopup.Show()
oPopup.AddBar('test3', '\<Test 3', 2 )
oPopup.Show()
RELEASE oPopup
DISPLAY MEMORY
After releasing the object reference variable, you will observe that the popup is no longer defined, thanks to the .Destroy() event calling the .Release() methods, which in turn released the popup. Example 2: A simple stand-alone padIn a similar fashion, the _mnuCtrlPad class can be used separately from the other menu classes. PUBLIC oPad oPad = NEWOBJECT( '_mnuCtrlPad', 'menus6.vcx' ) WITH oPad .Before = '_MEDIT' .Command = "wait window 'Boo!'" .Enabled = .F. .KeyShortCut = "Alt-S" .Caption = '\<Scare' ENDWITH When the .Caption property is assigned, the associated assign method automatically calls the .Define() to refresh the FoxPro menu component. If you examine the code in the .Define() method of the _mnuCtrlPad class, you will see that we have made the class intelligent enough to determine that if it is not a member object of a _mnuMenubar container, it attaches the pad to the system menu _msysmenu. Note the use of the .Before property to place the new menu pad before the _MEDIT pad of _msysmenu. Now try each of the following in the command window: oPad.Enabled = .T. oPad.Click() oPad.Caption = "Arrgh!" RELEASE oPad You can see that once again, the .Destroy() event ensures that the pad is released from the system menu as the object is destroyed. Example 3: Appending a complete menuWhere more than one pad or one or more menus are required to be appended to the system menu bar, a _mnuMenubar container object will be required. #include menus6.h PUBLIC oMenu oMenu = NEWOBJECT( '_mnuMenuBar', 'menus6',"",n_MNU_APPEND ) oMenu.AddMenu( 'Extra', 'E\<xtra' ) *// Add bars to the menu, as in Example 1: oMenu.Extra.AddBar( 'Bar1', '\<Test One') WITH oMenu.Extra.Bar1 .Command = "wait window 'Hello Test 1'" .Message = "This is test one's message" .KeyShortCut = "Ctrl-F12" .KeySCText = "Ctrl-F12" ENDWITH oMenu.Extra.AddBar( 'SP100', '\-' ) oMenu.Extra.AddBar( 'Bar2', 'Test \<2' ) WITH oMenu.Extra.Bar2 .Command = "wait window 'Hello Test 2'" .Message = "This is test two's message" .KeyShortCut = "Ctrl-F11" .FontName = 'Arial' .FontSize = 12 .FontBold = .T. ENDWITH What we have done is essentially told the oMenu object to attach a popup like the one we built in Example 1 to the system menu. Let's add a cascading menu called SubMenu as well: oMenu.Extra.AddMenu( 'SubMenu', '\<Submenu' ) oMenu.Extra.SubMenu.AddBar( 'one', 'Hello' ) oMenu.Extra.SubMenu.AddBar( 'two', 'Goodbye' ) *// Append the menu to the system menu bar: oMenu.Define() You should now see the menu components appended to the system menu (See Figure 5). Figure 5. Example 3
Let's change the prompt of the bars on the fly: oMenu.Extra.SubMenu.one.Caption = "Bonjour" oMenu.Extra.SubMenu.two.Caption = "Au Revoir" You should observe that the popup bar prompts have now changed. And you didn't have to remember a single bar number to do it, either. The assign methods on the .Caption property is again ensuring that the menu components are refreshed automatically. The important thing is that the object interface reflects the task actually being performed. Now try the following in the command window: oMenu.Extra.Enabled = .F. oMenu.Extra.Enabled = .T. oMenu.Extra.Bar2.Enabled = .F. oMenu.Extra.Bar2.Enabled = .T. The menu bars should enable and disable as you toggle the .Enabled property. oMenu.Extra.Submenu.One.Command = "Wait window 'Hello!'" oMenu.Extra.Submenu.Two.Command = "Wait window 'Goodbye!'" oMenu.Refresh() We need the Refresh() call here because we haven't added assign methods to the .Command property. We could in theory attach assign methods to all of the properties that we want to reflect instantly in the FoxPro menu structure, but obviously there would be a performance hit as many properties were assigned values in a group. In practice, I would restrict the use of assign methods to the properties that you would find most useful. Here, that is .Caption and .Enabled. Now try adding a new bar to the submenu: oMenu.Extra.Submenu.AddBar('three','Back Soon')
We can also reference the child menu objects by using the .Controls collection: oMenu.Extra.Submenu.controls[2].Caption = "new prompt" RELEASE oMenu Example 4: Replacing the system menuThe following code replaces the default FoxPro system menu with an object-menu version: #include menus6.h
PUBLIC oMainMenu
oMainMenu = NEWOBJECT( '_mnuMenuBar', "menus6.vcx","", n_MNU_REPLACE )
oMainMenu.AddMenu('File', '\<File' )
oMainMenu.File.KeyShortCut = 'Alt-F'
oMainMenu.File.AddBar( 'Newfile', '\<New', _MFI_NEW )
oMainMenu.File.AddBar( 'Openfile', '\<Open', _MFI_OPEN )
oMainMenu.File.AddBar( 'Sep100', '\-' )
oMainMenu.File.AddBar( 'Closefile', '\<Close', _MFI_CLOSE )
oMainMenu.AddPad('Exit','E\<xit' )
WITH oMainMenu.Exit
.Command = 'release oMainMenu'
.KeyShortCut = 'Alt-X'
.KeySCText = 'Alt-X'
ENDWITH
oMainMenu.File.Closefile.Enabled = .F. && system bar overrides this
oMainMenu.Define()
Selecting the 'Exit' pad, or alternatively, running oMainMenu.Exit.Click() from the command window will return the menu to its original state. A word about using system menu bars: As they don't have a command to execute, but obtain their behaviour by virtue of the fact that they have a special system bar number, we can not programmatically invoke their behaviour by calling their .Click() method unless we have also assigned them a hot key shortcut: oMainMenu.File.Newfile.Click() && nothing happens oMainMenu.File.Newfile.KeyShortCut = "Ctrl-N" oMainMenu.File.Newfile.KeySCText = "Ctrl-N" oMainMenu.File.Refresh() oMainMenu.File.Newfile.Click() && now it works Check out the code in the _mnuControl::Click() for more information. Example 5: Instantiating directly from an .MNXAlthough the syntax of object oriented menus is very simple and straightforward, we can go one step further and create a menu object by reading the .MNX table directly. This example uses an instance of the _mnuBuilder class to provide the extra functionality we require. PUBLIC oMainMenu
*// Create an instance of the _mnuBuilder class:
public oMenuBuilder
oMenuBuilder = CREATEOBJECT('_mnuBuilder')
*// Construct the menu hierarchy by calling methods
*// of the _mnuBuilder class:
oMainMenu = oMenuBuilder.GetFromMNX( 'quick.mnx' )
oMainMenu.Define()
Try the following in the command window: oMainMenu.Edit.Paste.Click() oMainMenu.Tools.Options.Enabled = .F. This looks pretty impressive, but there are some compromises under the hood. Check out oMainMenu.Window.Controls[3].Name. It will be "_Hide" rather than "Hide". This is because .Hide() is already used as a method of the container menu object and is therefore not a valid child object name. When the _mnuContainer::NewObject()method detects this, it prefixes an underscore to the object name to ensure that it is valid. RELEASE oMainMenu Creating a conditional menuA conditional menu is one that only appears when a specific window has the focus. FoxPro is full of them: the Project Manager menu, and the Menu Designer and Form Designer menus, to name but three. Let's assume that you have a form you are designing that requires a conditional menu pad. Here's how to add a conditional menu pad and popup that only appears on the system menu when your form is on top: Example 6a - Dropping an instance of _mnuMenubar on a form· Create a new form. · Drop an instance of _mnuMenubar on the form. Name it "oMenu". · Set the .oMenu.Style property to 3 (append) · Add the following code to the form's methods: * .Init():
THIS.oMenu.AddMenu('example', 'E\<xample6' )
THIS.oMenu.Example.AddBar( 'about', '\<About...')
THIS.oMenu.Example.AddBar( 'close', 'Close form')
THIS.oMenu.Example.About.Command = 'wait window "Version 1.00"'
THIS.oMenu.Example.close.Command = '_SCREEN.ActiveForm.Release()'
THIS.oMenu.Define()
* .Deactivate():
THIS.oMenu.Hide()
* .Activate():
THIS.oMenu.Show()
These steps are all that is required to add a conditional menu to your form. Run the form now and observe that the additional pad and menu only appear on the system menubar when the form is active. Try running several copies of the form, and switch between them and the command window. Alternatively, we could use the _mnuBuilder class to extract the menu structure from an .MNX file, as in Example 6b: Example 6b - Building a referenced menu object with _mnuBuilder· Create a new form. · Drop an instance of _mnuBuilder on the form. Name it "MenuBuilder". · Add a custom property to the form, called ".Menu" · Add the following code to the form's methods: * .Init(): THIS.Menu = THIS.MenuBuilder.GetFromMNX( 'EXAMPLE6.MNX' ) THIS.Menu.Define() * .Deactivate(): THIS.Menu.Hide() * .Activate(): THIS.Menu.Show() Try this code out by executing several copies of your form, and clicking between them and other FoxPro windows. Note how the menu is still available as you close and switch between each instance of the form and the command window. Wrapping up about wrapper classesThe class library that I have presented here may not always be a practical part of your VFP applications. I have to admit that I have changed the implementation in the source code considerably while writing this article; and there are areas where I will probably improve or change things still further at a later date. Whether or not we end up with a useful component to add to our grab-bag of re-useable software components or not, going through the processes of analysis, design and implementation of the menu class library will be good practice. I hope it will give you some valuable insight when you come to design your own classes for your next VFP project. You can obtain the source code to this article here. [1] Booch, G. 1994. Object-oriented analysis and design with applications, Second edition. Redwood City, California: Benjamin Cummings, p. 41 [2] I'm not saying that creating duplicated functionality between different classes is always a good idea. Generally, it is a sign of unoptimized class design. But you have to know when to break the rules, and I think that in this case the improved usability of the classes for programmers is justification enough. Information in this article have appeared elsewhere in various forms including session notes for FoxTeach '96; and dFPUG's Fuchs newsletter and developer's Konferenz session notes in 1998. Copyright (c) 1996-2001 Colin Nicholls |
Object-Oriented Menus in Visual FoxPro